Setting up File Manager
- 10 Feb 2025
- Contributors


- Print
- DarkLight
- PDF
Setting up File Manager
- Updated on 10 Feb 2025
- Contributors
- Print
- DarkLight
- PDF
Article summary
Did you find this summary helpful?
Thank you for your feedback
File Manager Configuration
File Manager is a feature in Foundation Cloud Community Portal (FCCP) that makes documents available to certain portal users. Example: A foundation that wants to provide all board members with a meeting schedule can upload the schedule document to the File Manager and set it so only users defined as Board Members are able to view the document.
A foundation user with Site Admin rights can configure the folder structure and which user roles have access to each folder.
Currently, File Manager allows document sharing with users in the following Roles:
- Donor
- Fund Viewer
- Board member
Accessing File Manager
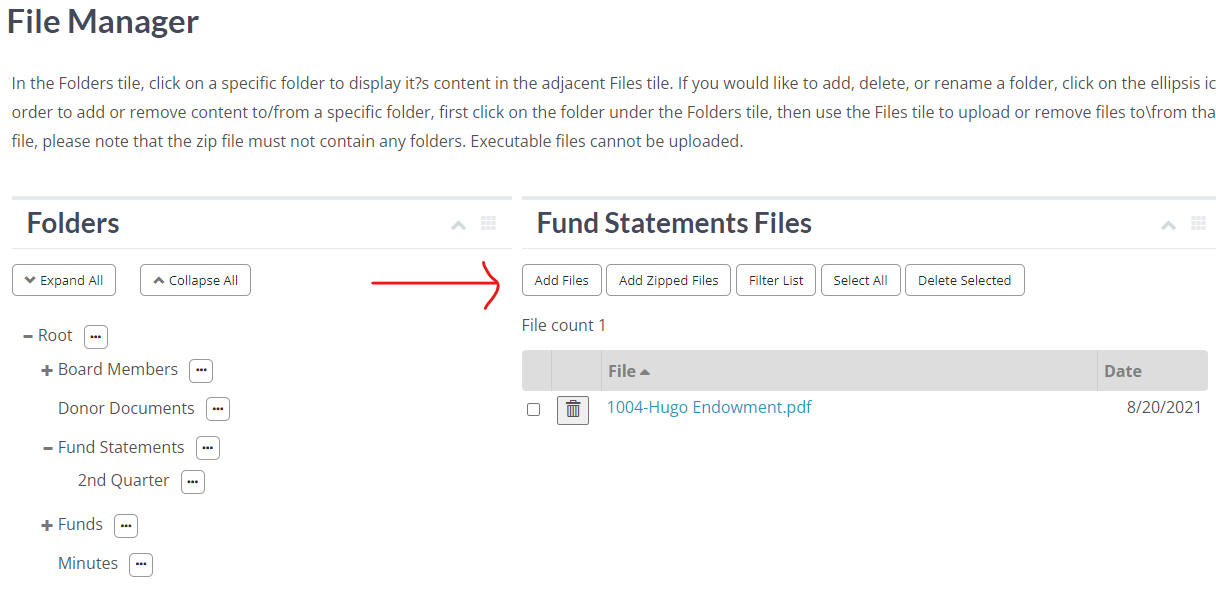
The File Manager is accessed in FCCP under Site Admin > File Manager. The File Manager folder screen will look similar to the image below. In the Folders tile, click on a specific folder to display its content in the adjacent Root Files tile. When the File Manager is initially set up, only one folder (Root) exists.

Adding Folders
You can add folders within the Root folder. This is helpful for separating out the audience for the documents that are made available. Example: Someone could create a folder specifically for board members that contains only documents that pertain to board members such as upcoming board meeting notes, board minutes, etc.
To add a new folder:
- Use the ellipsis icon next to the Root folder and click Add Folder.
- Enter a name for the new folder.
In the image below, the Board Members, Fund Statements, and Funds folders were all added from the Root folder. 
Renaming Folders
- Use the ellipsis icon next to the folder you want to rename.
- Enter a new name for the folder.
Removing Folders
To remove a folder, use the ellipsis icon next to the folder you wish to remove and click Delete.
Adding Documents (Files) to a Folder
Documents are uploaded as files into the appropriate folder in the File Manager. To add documents to a folder:
- in FCCP, navigate to Site Admin > File Manager.
- Click on the specific folder that the file needs to be in.
- Click on the Add Files button at the top of the Files tile.
- After naming the file and adding it to a folder, you will need to configure the role to display the file as described in the next Making the Files Available for Download section.

Notes:
- Use the Add Zipped Files button to upload a lot of files at one time. The zip file must contain only files, no folders.
- Executable files cannot be uploaded.
Making the Files Available for Download
Files can be stored and organized at the root level, this is beneficial if a file is for all donors or board members, e.g., announcements from the Foundation. Folder/File paths need to be set up for the various roles within FCCP. These settings, along with naming conventions, are what identifies which files are available to which user. Repeat these steps per role.
- Login to FCCP.
- Navigate Site Admin > Page Settings > Role (Donor, Fund Viewer, Board Member).
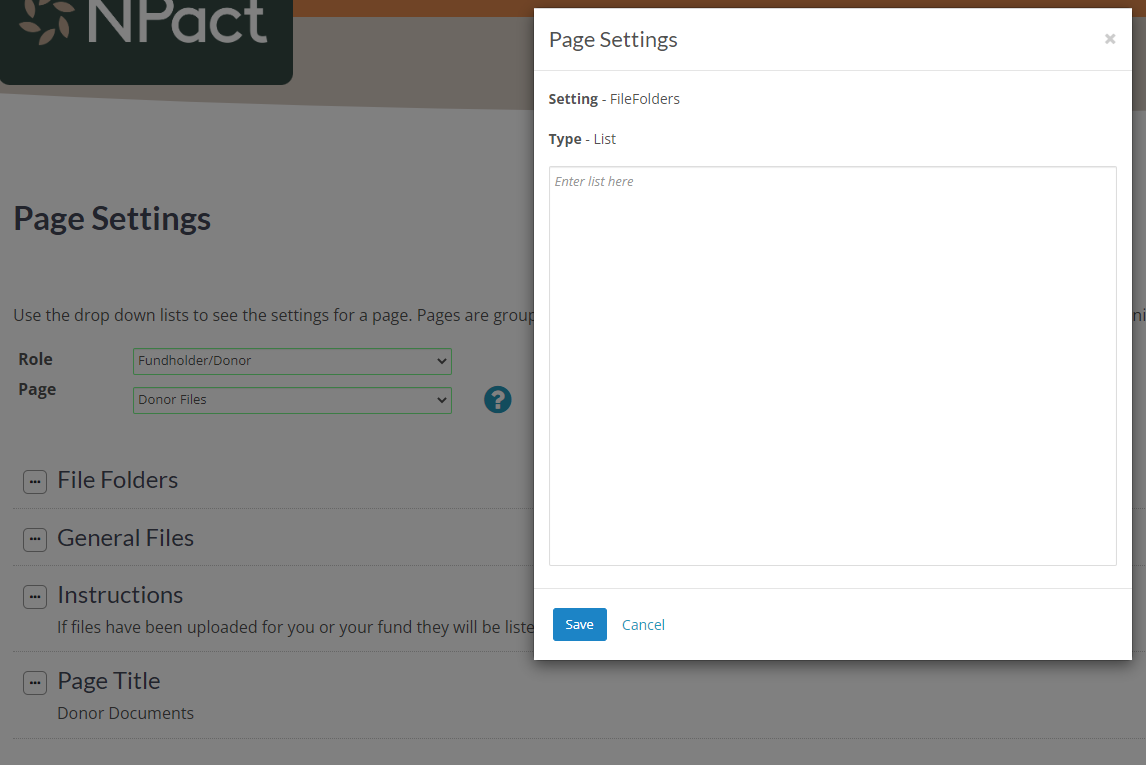
- For the page select the option named [Role] Files, e.g. Donor Files or Board Member Files. You will need to configure File Folders and General Files.
- Use the ellipsis next to the File Folders option to edit the folders list. This is an ordered list of the folder paths used to hold the various targeted files.
- The sub folder names are used on the page as section headings.
- Each folder path should go on its own line.
- Using the example shown previously the Donor Documents folder path would simply be "Donor Documents".
- To add subfolders insert the name in this format: foldername\subfoldername. Using the example above, to target the 2nd quarter fund statements, the folder path would be Fund Statements\2nd Quarter.
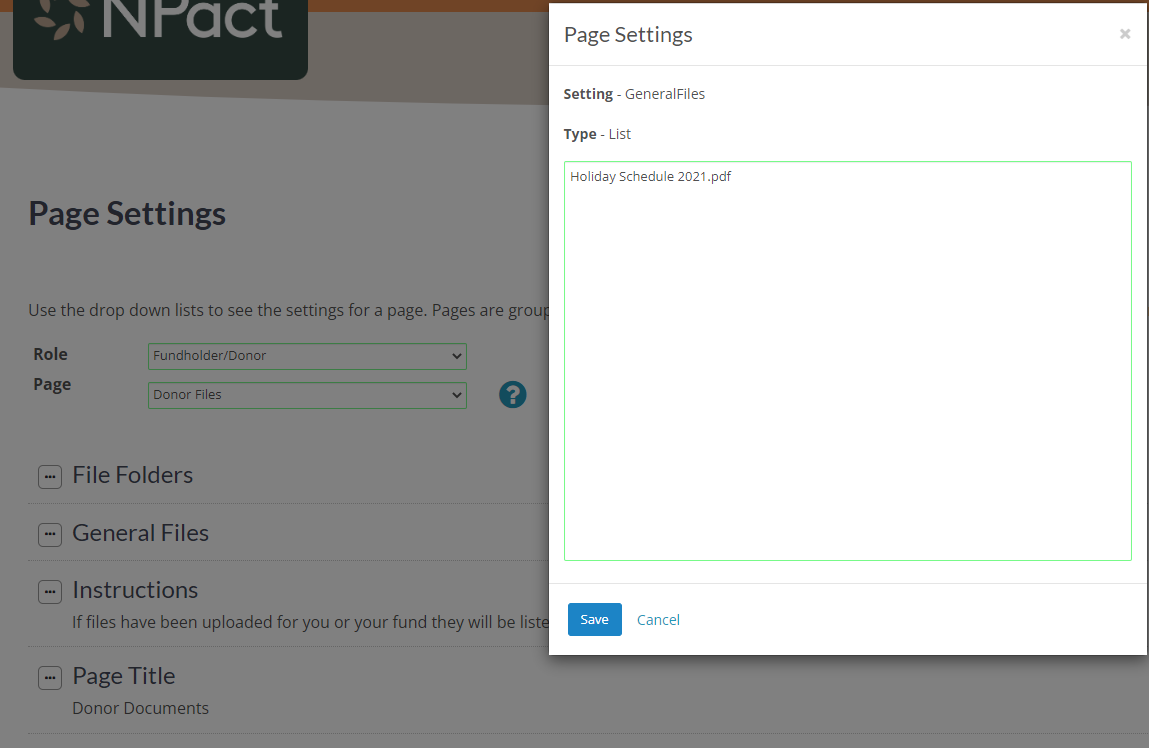
- Use the ellipsis next to the General Files option to edit the files list. This is an ordered list of the file paths for all the general files that are available for everyone in this Role. "General" is used as the section heading. Each folder\file should go on its own line. Using the examples shown above the holiday schedule would be listed as "Holiday Schedule 2021.pdf". Or for the Board Members role the sample board review document would be listed as "Board Members\Sample Board Review Document(1).pdf".


Targeting Documents for a Specific Constituent or Fund
Naming conventions are used to target files to specific users or funds (called targeted files). Naming convention defaults are as follows:
- Specific users like a donor or board member: GEConstituentID-Full Name of Constituent (as it is GE) file name. For example, for Katherine Congdon, who has a GE constituent ID of 9186, the file would be named:
- 9186-Katherine Congdon Thankyouletter.pdf
- Specific funds: Fund ID-Fund Number-Fund Name. You may need to use a Query to get the Fund ID. For example, for Earl & Katherine W Congdon Fund, with the Fund Number of X1008 and a Fund ID of 257, would be:
- 257-X1008-Earl E Katherine W Congdon Family Fund Statement 2nd quarter
- To use a different naming format other than the defaults listed above, please start a support case.
Was this article helpful?
