Updated Grant Request Form (v2.7.5)
- 11 Jan 2024
- Contributors

- Print
- DarkLight
- PDF
Updated Grant Request Form (v2.7.5)
- Updated on 11 Jan 2024
- Contributors
- Print
- DarkLight
- PDF
Article summary
Did you find this summary helpful?
Thank you for your feedback
The Grant Request form has a new look and feel!
All page instructions, fields, and labels from the old grant request form have been preserved. To make changes, please go to Site Admin > Page Settings and select Role: Donor and Page: Grant Request.
Below is a preview of our new and intuitive three-step grant recommendation form.
Step 1: Recipient Information

- The Source Fund section allows the user to search and select the fund associated with the grant request. Click Select Fund to search for a fund by name. Once the fund is selected, this section displays the Fund Name, Available Balance, Net Assets, and Pending Grants & Payments.
- In the Recipient Search section, identify the recipient (the organization or person to whom the Grant Request should be given). Before adding a new recipient, use the Recipient Search feature to locate the recipient in one of the following sources. Note: Some of the options below may not have been enabled for all foundations.
- Grants Database – Choose from a list of Recipients from Foundation Cloud Grants (FCG).
- Past Grants – Choose from a list of Grant Requests submitted in the past to recreate a new request. If no previous Requests have been submitted, this will be empty.
- IRS List - Choose from a list of valid charitable organizations published by the IRS.
- CRM System - Choose from the foundation's list of available recipients from the CRM software.
- Once the recipient is located, select it. Review the Recipient Details and edit appropriate fields.
- If selecting a new recipient, click the link: Cannot Find a Recipient? Add a New One. Then, fill out the Recipient Details fields. The information entered here will live on the Grant Request record in Foundation Cloud Grants.
- Once completed, select Next.
Step 2: Grant Information
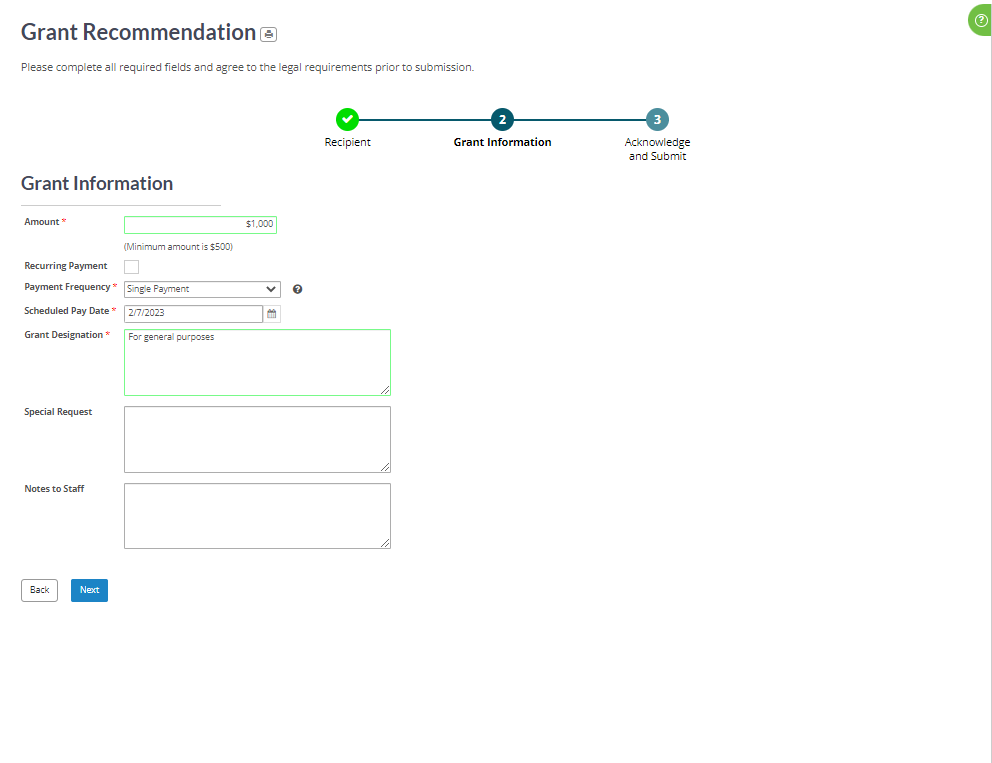

This tab contains the details of the Grant Request.
- Amount - Enter the total amount to be paid. Note: The fund may have a minimum amount (e.g. $100). This is a mandatory field.
- Recurring Payment - Check this box if this payment should be automatically made on a regular basis.
- Payment Frequency - If there are multiple payments, select how often payments should be made (Options: Monthly, Quarterly, Semi-Annually, Annually). Otherwise, select Single Payment.
- Number of Payments (for non-recurring payments only) - Enter the total number of payments. These payments will add up to the total Amount.
- Scheduled Pay Date (for non-recurring payments only) - Select the date that the first grant payment is to be made.
- Start Date (for recurring payments only) - Use the calendar tool to select the date the recurring payments are to start.
- End Date (for recurring payments only) - Use the calendar tool to select the date the recurring payments are to end.
- Grant Designation - Describe the purpose of the grant and how funds are to be used.
- Special Request - Describe instructions or notes about the grant. This information will appear on the grant letter.
- Notes to Staff - Enter any additional notes to direct the foundation on how to process the request.
Step 3: Acknowledge and Submit

This tab contains the Acknowledgement information for the Grant Request. If/when the Grant Request is processed and granted by the foundation, an acknowledgement letter will be sent to the name and address shown here.
- Name – Review the name of the contact to which the acknowledgement should be sent.
- Address, City, State, Zip – Review the address of the contact to which the acknowledgement should be sent.
- Anonymous Fund - Check this if the Recipient should NOT know the fund from which the grant was given.
- Anonymous Donor - Check this if the Recipient should NOT know the donor who recommended the grant.
- Review the Legal Statement, check “I Agree”, and complete the Advisor Signature.
- To finalize the Grant Request, select Submit. If there are any required fields missing, the user will be informed of these, and the Grant Request will NOT be submitted yet. Note: In some circumstances a Grant Request may require two signatures. In that event, the Submit action will inform the user that the application is saved and is still pending submission by another Donor on the Fund. To save progress without submitting the Grant Request, select Save Draft.
To locate saved drafts and submitted requests, navigate to the Fundholder/Donor menu and select Saved Recommendations.
To print this page, click the printer icon next to the page title.
Fund Transfer Form

Instructions
Here is a generic set of instructions an organization can use to guide donors through this form if you don't offer instructions already:
- Page Instructions - Use this page to recommend a grant to a nonprofit organization. Please complete all required fields prior to submission.
- Funding Instructions - Your grant recommendation will be made from the fund selected below.
- Recipient Instructions - Find a recipient using one of the search methods below. If you are entering a New Recipient, please provide as much information as possible to help with the vetting process.
- Grant Information Instructions - Please enter the grant information below.
- Acknowledgement Instructions - This acknowledgement indicates consent to sharing information with the nonprofit grant recipient. If you do not wish to share this information, please select an anonymous option.
- Submit Instructions - Please review your grant recommendation and agree to the legal terms prior to submission.
Was this article helpful?
