Web Application Processing Wizard
- 22 Mar 2023
- Contributors


- Print
- DarkLight
- PDF
Web Application Processing Wizard
- Updated on 22 Mar 2023
- Contributors
- Print
- DarkLight
- PDF
Article summary
Did you find this summary helpful?
Thank you for your feedback
Through Spectrum Web Portal (SWP), constituents fill out an online application that will get turned into a proposal in Grant Edge Classic (GE Classic). For more information about online applications, see Creating applications. Before processing web applications, an application workflow needs to be established. This document covers processing multiple applications at one time; to process applications individually please see Processing a Web Application to a Proposal and Grant.
Proposal Web Application:
- Click Web Apps > Manage Online Proposal Applications.
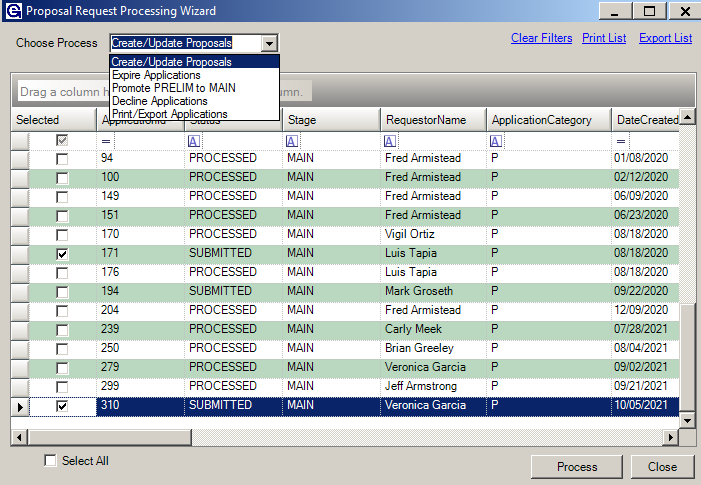
- On the Proposal Applications grid the user can rearrange columns by dragging and dropping the heading of each column.
- To process a web application, it must have the status of Submitted. Here is a list of possible statuses for a web application:
- New – Someone is starting to fill out an application.
- Submitted – An organization/business has filled out an application and it is ready to be processed.
- Created – Someone has started to fill out the application, but is not done and will have to go back and finish it.
- Processed – Internally someone from the foundation has already reviewed the application and processed it into a proposal.
- Select Processing Wizard.
- Use the drop-down list to choose one of the following processing options:
- Create/Update proposal – This processes the application into a proposal for further review and eventual funding or declination.
- Expire Applications - This allows for a manual expiring on applications in an open application round.
- Promote PRELIM to MAIN - Moves two stage applications from the first preliminary stage to the main stage.
- Decline Applications – The user can decline the application at this point if the applicant doesn’t meet criteria and there is no need for further consideration from reviewers.
- Print/Export Applications - Allows the user to run a predefined report and either export the application or print it.
- Use the Select All checkbox at the bottom of the window to select every available web application or check the checkbox at the row heading for specific applications.
- Click Process.
- In the new window, select the Proposal Type - this attaches the workflow and default grant type to the proposal in order to make a grant. See separate instructions for creating templates for proposals.
- Check or clear the checkboxes related to characteristics found on the applicant or fund record.
- Click Create Proposal(s).
- In a new window, a confirmation message will prompt the user to view the logs where the generated proposal ID number will be listed.
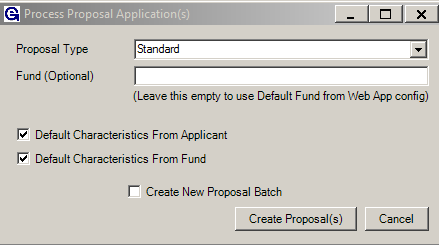
- Close the Processing Wizard.


For the next step in processing a proposal into a grant see Processing a Web Application to a Proposal and Grant.
Was this article helpful?
