- Print
- DarkLight
- PDF
Create a Pivot Table
This section walks you through the process of creating a pivot table to analyze FIMS data in Microsoft Excel
Note: This procedure uses Gifts data as the basis for the pivot table. Keep in mind that although specific data is used in this procedure, you can apply these steps to any data you want to analyze.
1. In FIMS, run a User Defined Gift History Export. Refer to the User Defined Gift History Export in the Reports chapter for more information.
Note: Keep in mind that you can use any fields that are relevant to your organization and the kind of report you want to run. If you want to practice with this specific example, select the following relevant analysis fields:
- Fund (FundID, Alpha Sort Name, Fund Name, Division, Fund Class, Fund Type, Subtype, Establishing Gift, Interest Code, Cash Requirement, Source Code, County)
- FundDetailHistory (Transaction amount)
- GiftHistory (Type, Source, Solicitor, Purpose, Gift Amount)
- Donor (Class, Occupation, Ethnic, Staff)
- Profile (Org / Ind, City, State, Zip)
2. Open Microsoft Excel and enter the exported data into a spreadsheet (refer to Pasting Data into Excel, or Using the Excel Import Wizard for more information).
3. Once the data is in the Excel spreadsheet be sure to highlight all data.
4. Select Insert > Pivot Table > From Table/Range.
Note: It is also possible to build Pivot Tables directly from outside sources (for example, ASCII files exported from FIMS).
.png)
5. Select whether you want to create the pivot table in a new or existing spreadsheet, and then click the OK button. The Layout window opens.
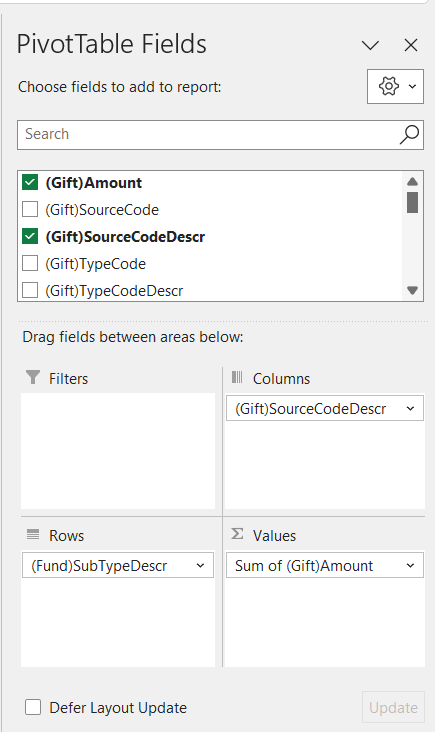
6. Drag the field options on the right to the areas on the bottom right to tell the wizard which fields you want to use for the analysis, and which is the value that you want to analyze. For this example, do the following:
- Drag the (Gift) Amount field to the VALUES section (Make sure the value is Sum of (Gift) Amount).
- Drag the (Fund) SubType Description field to the ROW section.
- Drag the (Gift) Source Code Description field to the COLUMN section.

8. As you are moving these fields into place in the appropriate areas you can see the pivot table taking shape. You can now remove fields from rows or columns and put others in their place to analyze Gift amounts in different ways. Below is the completed pivot table.


