Design Statement Samples
- 19 Sep 2023
- Contributors


- Print
- DarkLight
- PDF
Design Statement Samples
- Updated on 19 Sep 2023
- Contributors
- Print
- DarkLight
- PDF
Article summary
Did you find this summary helpful?
Thank you for your feedback
Design Statement Samples
This section provides several examples and tips for designing different types of financial statements. Refer to Working with Design Statements for general information about getting started with Design Statements.
Designing Columnar Financial Statements
Columnar Financial Statements use the Row Format in a unique way. Unlike Fund and Consolidated Statements, which print different General Ledger account values on each line or row, Columnar Financial Statements print a Fund name as a row label in the first column of each row, so each row displays values for a specific Fund.
Values from General Ledger accounts that belong to the selected Funds (or values calculated from previous columns) appear in each of the columns. You can specify subtotals for sorted groups of Funds at run time.
Columnar-style reports are useful because they you to present the essential financial information for about fifty Funds on one page. The report itself looks similar to one created with a spreadsheet program.
NOTE: Although you can create Columnar Financial Statements by creating separate Row and Column Format records, it is easier to create them together via the Columnar Financial Statement Maintenance utility. Refer to the Using Columnar Financial Statement Maintenance section below for more information.
Using Columnar Financial Statement Maintenance
The Columnar Financial Statement Maintenance utility allows you to create the rows and columns for your columnar Financial Statements at the same time. This is useful, because columnar statements must have the same number of rows and columns and using this utility to create them helps to ensure that you maintain the one-to-one relationship.
- In the General Ledger module, click the Design Statements super tab and then click the Processes tab.
- Select Columnar Financial Statement Maintenance from the Design Statement Processes list and then click the Run Process button. The Columnar Financial Statement Maintenance Selection window opens.
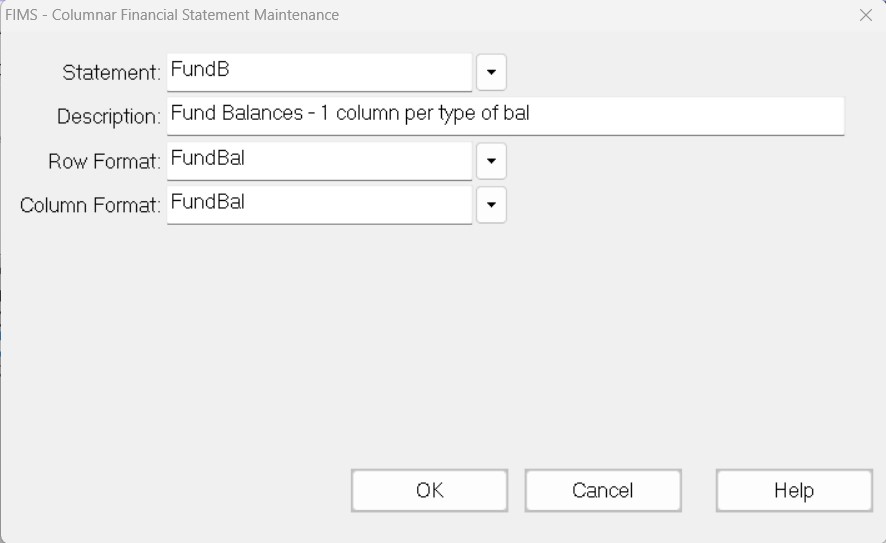
- In the Statement field, enter the name you want to give to your new statement.
NOTE: You can also select an existing Statement to edit. If you do this, the Description, Row Format, and Column Format fields are automatically populated based on the Statement you select.

- Enter a text description of the new statement.
- (Optional) Enter names for the new Row Format and Column Format that will make up the statement. If you leave these fields blank, FIMS will automatically name the records based on the Statement name.
- Click OK. The Columnar Financial Statement Maintenance window opens.
.jpg)
- Create each of your columns as you would on the Column Format tab.
- The row(s) for each column appear in the bottom section of the window. Create the rows while the appropriate column is selected.
NOTE: The only available Row Format fields are Format, Balance, Formula, and From / Through.
.jpg)
- (Optional) If you want to add additional rows to any of your columns (for example, to combine the balances of several non-contiguous General Ledger accounts in one column), click the Add Row button and configure the new row. You can also remove a row by clicking the Remove Row button.
- When you are finished creating all of your rows and columns, click the Done button.
Row Format Tips
- Each Row Format line specifies the General Ledger account values that will print in each column. The first row determines what will print in the first column; the second row determines what will print in the second column; and so on.
- You can only use GL, FBE, FBB, or BB Format codes when you are creating these statements.
- If you want one column to combine the balances of several non-contiguous General Ledger accounts, create two or more rows with the same row number.
- The Description in the row records is useful for identifying the record, but it will not print on the report.
- The Print Control and Print Column fields have no effect on columnar statements.
- Do not use a Formula row to set up a calculated column. Instead, select Calc or Perc in the Type field on the Column Format.
NOTE: If the calculated column is not the last column, you must create a blank Tot or Desc row as a place holder, so your rows and columns will correspond.
- The From / Through fields work as usual on Columnar Statements, so you can achieve ending balance columns with a GL row. For example, for the principal balance, enter From the first Fund balance account Through the highest expense account, and From the Q1 account type Through the X2 account type.
Column Format Tips
- Create one column in the Column Format for each non-calculating column (which the Columnar Financial Statement Maintenance will enforce).
- Enter Column headings for each column.
- Select GL in the Type field.
- The Fiscal Year, Period, Actual or Budget, and Current or YTD fields work exactly as they do on other reports.
- To create a calculation column based on previous column values, add a column with Perc or Calc in the Type field and an appropriate formula in the Formula field.
- The maximum number of columns is 16.
Sample Columnar Statement
.jpg)
Sample Columnar Statement (Row Format)

Sample Columnar Statement (Column Format)
.jpg)
Designing Statements of Financial Activity
A Statement of Financial Activity (also known as a P&L) typically lists revenues, expenses, and transfer activity. These statements are sometimes preceded by a beginning Fund balance and followed by an ending Fund balance and can either reflect the total Fund activity or have separate sections for each Fund balance (for example, historic Gifts, accumulated returns, available to spend).
- You can design these statements to run as either a Consolidated Financial Statement or a Fund Statement.
- The Auto Create Row Formatter utility allows you to build a basic Row Format that includes a GL row for each activity account in the Master Chart, sorted and subtotaled into three sections by account type: Revenue, Transfers, and Expenses. A Total Activity row completes the statement.
NOTE: This utility is helpful even if you reorder the rows by changing the Row Numbers, because it ensures that no accounts in the Master Chart will be skipped.
NOTE: Refer to Automatically Creating Row Formats for more information about this utility.
- If you want to add beginning or ending Fund balances to the statement, use the FBB (Beginning Fund Balance) and FBE (Ending Fund Balance) row Format codes, and then specify the desired balances in the From and Through fields.
Designing Statements of Quarterly Activity
A Row Format used for a single column, year to date, consolidated Statement of Financial Activities can easily be modified to create a statement that shows quarterly activity. This also requires a Column Format with four columns:
Column | A | B | C | D |
|---|---|---|---|---|
Header | Q1 | Q2 | Q3 | Q4 |
Type | G/L | G/L | G/L | G/L |
Year | Base | Base | Base | Base |
Period | 1 to 3 | 4 to 6 | 7 to 9 | 10 to 12 |
Current/YTD | Curr | Curr | Curr | Curr |
Budget/Actual | Actual | Actual | Actual | Actual |
The Column Format normally controls the period of the balances that will be printed. In this case, each of the four columns is set up to print current activity for one quarter.
In order to print a beginning quarterly balance at the top of each column, you will also need to use the FBB Format code for the first row. This will print the Fund Balances that you specify in the From / Through fields as of the beginning of the period indicated by the Column Format.
Designing Donor Statements
FIMS allows you to print donor statements directly from the FIMS Viewer. However, If you need to create presentation-quality Fund statements that are suitable for mailing to donor advisors or other Fund representatives, you should run the Fund Statements Export to export the data and create mail-merged statements in Microsoft Word.
NOTE: Some complex custom Fund statements are best created by FIMS Support using Crystal Reports. Please contact FIMS Support for more information.
Fund Statements
NOTE: Refer to Running Fund Statements for more information about running these statements.
- Fund Statements that you print from the FIMS Viewer are easy to set up and run. You can make selections based on Fund categories and / or Fund Representative types.
- You can optionally print the Fund Representative's name on the statement.
- You can print a single column of YTD activity, or a single column with just current quarter activity, or two columns presenting both YTD and quarterly activity.
- You can print Gift and Grant detail on an additional page.
- These statements must use a fixed-width font (for example, Courier), and the system cannot print any graphical enhancements on the statements (for example, logos, borders, or shading).
Fund Statements Export
NOTE: Refer to Running the Fund Statements Export for more information about running these statements.
- Setting up exported Fund statements is somewhat complicated but running them is easy – especially if you exploit the Auto-Launch MS Word feature – and the results are impressive.
- If you create a donor statement using Microsoft Word, and mail merge a data file that you export via Fund Statements Export, there are no restrictions on the placement of General Ledger values on the page.
- You can include proportional fonts and graphical elements to enhance your statements.
- You can print Gift and Grant detail either on the same page, or on a separate page.
- You can set up more than one statement style. For example, you could create one style for endowed Funds and another for pass-through Funds, and you can mail merge and print both styles during a single export procedure.
- You can use the Fund Statement button on the Fund Management module’s toolbar to automatically display and / or print a single merged statement for the selected Fund. Refer to Setting up Single Fund Statements in the Fund Management module for more information.
Sample Statement
This sample displays a YTD Donor Statement that is merged into a Microsoft Word document, followed by its main merge document (with visible field codes).
Example: Donor Statement

Example: Donor Statement Merge Document (with Field Codes Visible)


Sample Donor Statement Row Format
Most donor statements are some variation of a P&L, or Statement of Activity. The following sample displays the Row Format report for an organization that has three Fund Balances: Historic Gifts (Q1, 31000), Accumulated Returns (Q2, 32000), and Available (Q3, 33000).
NOTE: The Auto Create Row Format utility can be useful in creating the Row Format records for these statements. Refer to Automatically Creating Row Formats for more information.
Example: Row Formatter Report for Donor Statement
Sample Donor Statement Column Format
The Column Format for the sample statement is a simple YTD format.
If you want to include two columns in your Fund statement (for example, YTD and Current quarterly activity), use a Column Format with one YTD column and one Current Column.
Example: Column Formatter Report for Donor Statement.jpg)
On the Row Format record, use the FBB Format code for the beginning Fund balance. Two values will be exported for the row – one from each column in the Column Format.
The beginning Fund balance for the year will appear in the first column, and the beginning Fund balance for the current (base) period will appear in the second column.
For the ending Fund balance, you can either use a Tot row that calculates the balance from earlier rows, or the FBE Format code. The ending Fund balance will be the same for each column.
Designing FASB Statements
FASB (Financial Accounting and Standards Board) guidelines require financial presentations that are not always useful for management purposes or for donors and the general community.
The FIMS General Ledger is designed to help you produce FASB compliant statements alternatively with more conventional presentations. This can be accomplished because of the Fund codes that become part of the General Ledger Account Key.
This section provides tips on complying with SFAS 116, 117, and 136.
SFAS No. 116 and 117
Most charitable organizations, citing their variance power, report net assets (with the exception of deferred Gifts, such as CRT’s), as Unrestricted.
However, some organizations still report net assets in three categories: Permanently Restricted, Temporarily Restricted, and Unrestricted. Assuming that the General Ledger has three Fund balances (Historic Gifts – FB1, Accumulated Earnings – FB2, and Available to Spend – FB3), this can be accomplished as follows:
- Code Endowed Funds with a Type code of Permanently Restricted. This permanent restriction applies only to the Historic Gift Balance (FB1), which is non-spendable for endowed Funds. The spendable part (Accumulated Earnings (FB2) and Available to Spend (FB3) Fund balances) is usually reported (interpretations of 116 and 117 vary) as either Unrestricted (Subtype = Unrestricted (discretionary) or Advised), or Temporarily Restricted (Subtype = Designated, Field of Interest, or Scholarship).
- Code Non-endowed Funds with a Not Applicable Type code, since the entire balance is spendable.
- Code Quasi-endowed Funds (non-endowed Funds that are managed like endowed Funds with multiple Fund balances) with either a Temporarily Restricted or Unrestricted Type code, depending on their donor restrictions.
The following simple financial statement contains consolidated Fund Balances (Net Assets) in P.T, and U categories. It is followed by its Row Formatter report:
Example: SFAS 116 / 117 Compliant Financial Statement
Example: Row Formatter Report for SFAS 116 / 117 Compliant Financial Statement

SFAS No. 136
FASB guidelines require organizations to present designated Funds as liabilities if contributions come from the agency rather than to the organization on behalf of the agency. This recent ruling has compelled many organizations to split designated Funds into two components that are represented in FIMS as two Fund records: a Donor-Designated Fund (contributions from individual donors to the organization), and an Agency-Designated Fund (contributions from the agency).
Agency-Designated Funds should be distinctively coded in order to separate them on financial statements. You can use the Division, Type, or Sub Type code for this purpose, depending on the way your organization generally uses these codes).
The General Ledger Accounts for Agency-Designated Funds should be set up as they would for any other Fund in the same Fund Class. There is no need to set up special liability accounts for Agency-Designated Funds, nor to attempt unusual Journal Entries (for example, crediting a liability account rather than a contribution account). Presenting Agency-Designated Funds as liabilities is a reporting function.
NOTE: Refer to Configuring Master / Subordinate Funds in the Fund Management module for more information on setting up these Funds.
Once you establish your Agency Designated Funds, you will need to modify your financial statements to back out the Agency-Designated Funds from the Net Assets. For example, on a typical consolidated balance sheet that presents assets, liabilities, and net assets, the Agency-Designated Funds should be reflected as follows:
- Assets: Include Agency-Designated assets.
- Liabilities: Exclude Agency-Designated liabilities, but specifically list Agency-Designated assets as liabilities.
- Net Assets: Exclude Agency-Designated net assets.
Example: Agency-Designated Balance Sheet
Review the Formula column on your Row Format records. Agency-Designated Funds are identified (in this case) by the Division code 3. Corporate Funds are included in Division Codes 0 through 2. The only liability held by agency Funds is Grants Payable.
Example: Row Formatter Report (Agency-Designated Funds)
Designing Administrative Expense Statements
Expense and budget statements can often share a single Row Format of administrative expenses. This can be combined with any of the following Column Formats (for example):
- A one-column YTD Column Format for a year-to-date expense report.
- A three-column Budget/Actual/Variance Column Format.
- A thirteen-column Column Format for a quarterly budget to actual report.
TIP: You can use the Auto Create Row Format utility to create a P&L Row Format for the Operating Fund Class. Then delete the revenue accounts, (and some of the Transfer accounts, if necessary). You can also change the Row Number of the remaining expense accounts to change the sequence of rows.
Example: Expense Statement
.jpg)
Example: Row Format for the Expense Statement
Example: Column Format for the Expense Statement
Was this article helpful?
