Enter Gifts
- 05 Jul 2023
- Contributors


- Print
- DarkLight
- PDF
Enter Gifts
- Updated on 05 Jul 2023
- Contributors
- Print
- DarkLight
- PDF
Article summary
Did you find this summary helpful?
Thank you for your feedback
Note: A Profile and Donor record must exist for each individual or organization who gives a Gift to the organization. Refer to Creating a Donor Record for more information.
Note: A Fund record must exist for every Fund that receives a Gift. Refer to Creating a Fund Record in the Fund Management module for more information.
Note: This procedure does not cover every field available for Gift entry. Refer to the Gift Tab for more information about all of the available fields.
In the Donor and Gift Management module, click the New Gift button on the toolbar. The Gift tab opens where you can enter the new Gift.
Gift Tab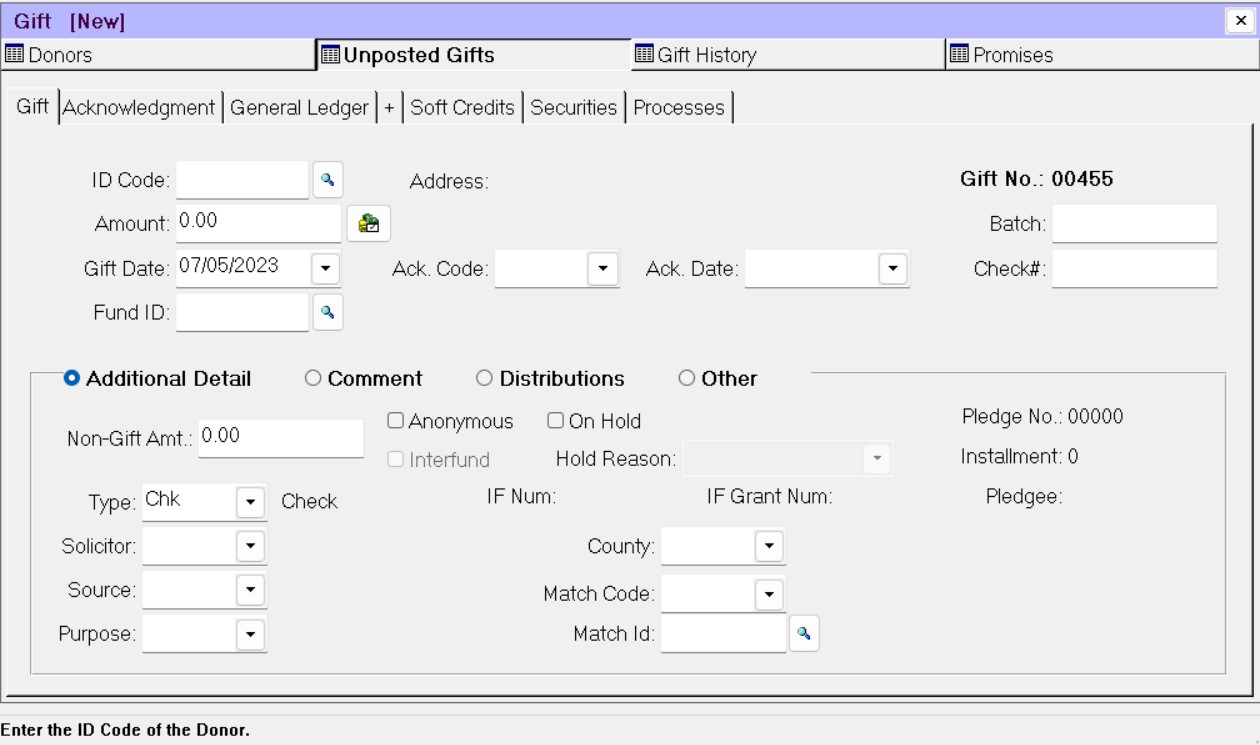

Enter the Profile ID Code for the Donor who gave the Gift. If you are not sure of the ID code, click the Lookup button next to this field (looks like a magnifying glass) and select the desired Donor from the list.
Note: The default value is the ID code for the Donor that is currently active, but you can enter any other valid ID code.
Note: If you try to enter a Gift for a Donor whose Profile is Inactive, the system will generate a warning.
Enter the total Gift Amount.
Enter the Gift Date. This date should generally be the date when the Gift was received. The default value is today’s date.
Enter the Fund ID for the Fund that is receiving the Gift. If you are not sure of the ID code, click the Lookup button next to this field (looks like a magnifying glass) and select the desired ID code from the list.
Note: If the Gift is being distributed between two or more Funds, click the Distributions radio button and enter the Amount, Fund ID, and Distribution Type for each distribution. The total of the distributions must equal the Gift Amount.
(Optional) Click the arrow in the Ack Code field and select a code that you can use to select the type of acknowledgement letter to create for this Gift.
(Optional) Enter any additional codes (for example, Gift Type, Source, or Purpose) that your organization requires for Gift entry.
Click the Save button on the toolbar.
The basic Gift entry is complete, but the Gift will not impact Gift History or create a debit and credit in the General Ledger journal until you run an error-free edit report and post the Gift. You may wish to export Gift data for merging into thank you letters or print a Gift deposit form to accompany the Gift checks to the bank. Refer to Processing Gifts for more information.
Tip: Keeping Track of Profile ID Codes for Gift Entry
If you are entering many Gifts from different Donors, write the Profile ID code for each Donor on their check before you begin the Gift entry process. This will help to expedite the entry process, because you will not have to look up the Profile ID code for each Gift.
Tip: Placing Gifts on Hold
FIMS allows you to place new Gifts on hold (via the On Hold checkbox on the Gift tab) to keep them from being included in the Edit and Post process. This can be helpful for several reasons. For example:
If you receive regular Gifts from the same Donor, and you want to create a “template” Gift record that you can simply copy each time the Donor makes a new Gift instead of manually entering all of the data. Placing the template Gift on hold keeps it in Unposted Gifts, so it will always be available to copy. If you use this method, be sure to clear the On Hold checkbox for the new Gift, but leave it selected on the template.
If you started the Gift entry process and then realized that a new Fund also had to be created. You can easily put the Gift on hold until the Fund creation process is finished.
If you are entering Stock Gifts you can place the Gift on hold until the proceeds are received. Refer to the Stock Gift Management module for more information about Stock Gifts.
Was this article helpful?
