Export Grant Application Data to Create Letters and Reports
- 17 Jul 2023
- Contributors

- Print
- DarkLight
- PDF
Export Grant Application Data to Create Letters and Reports
- Updated on 17 Jul 2023
- Contributors
- Print
- DarkLight
- PDF
Article summary
Did you find this summary helpful?
Thank you for your feedback
You are here: Grants > Process Grant Applications > Export Grant Application Data to Create Letters and Reports
Export Grant Application Data to Create Letters and Reports
This process creates a data file suitable for merging into a word processing document to create (for example) acknowledgment letters for Grantees upon initial receipt of Applications, Grant Summary Sheets for a committee or board, and award or denial letters for Grantees. The Grantee name and address is pulled from the Application record, which may have been modified from the Profile record.
Note: If you are creating award letters and would like to include the name and address of the donor advisor, so the Grantee may thank them independently, do one of the following:
Indicate the Donor Advisor on the Application’s Contact tab. That name and address will be exported so that you can merge the information into your letter.
Use the Unposted Application Export with Fund Rep. Automatic exceptions can be set up for donors that want to be anonymous. Refer to the Unposted Application Export with Fund Rep in the Reports chapter for more information.
Tip: Recommendation: Run the Edit report before exporting this data – to make sure that all of your Grant Application information is correct.
Note: You can create Contacts or add Affiliation codes to each unique Profile ID code included in this export. Refer to Creating Contacts from Reports and/or Exports in the Introduction and Adding Affiliations from Reports and/or Exports in the Profile Management module for more information.
In the Grantee and Grant Management module, click the Applications super tab, and then click the Processes tab.
Select Export Application Data from the Application Processes list and then click the Run Process button. The Application Data Selection window opens.
Application Data Selection Window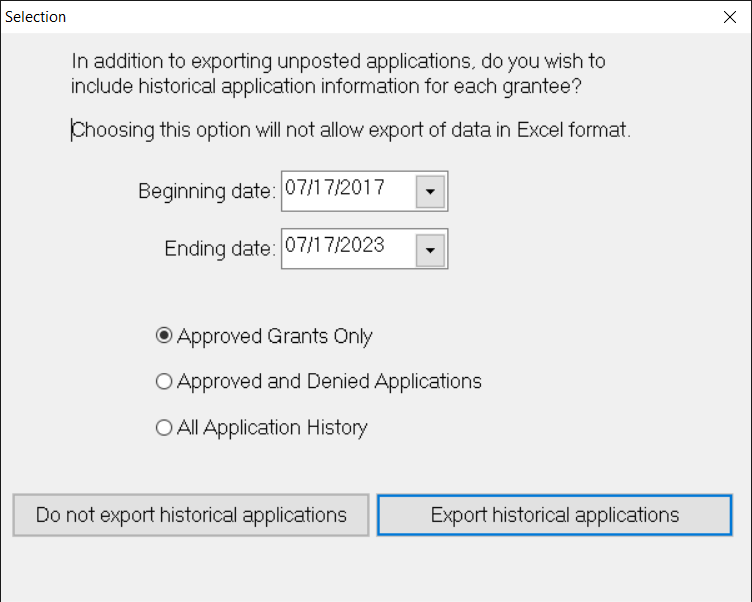
Enter the desired Beginning and Ending dates for the application information you want to export. The default Ending Date is today’s date.
Select the type of application information you want to export: Approved Grants Only, Approved and Denied Applications, or All Application History.
Do one of the following:
If you do not want to include historical information in the export, click the Do Not Export Historical Applications button.
If you want to include historical information in the export, enter the date range that you want to include, and select whether you want to include Approved Grants Only, Approved and Denied Applications, or All Application History. Once you have selected the data to include, click the Export Historical Applications button.

Select the desired Selection and Sorting criteria, just as you would in any standard FIMS report, and then click the Send To tab.
Verify the path and file name for the export file.
(Optional – but recommended) Click the Saved Reports tab to save the export configuration as a default for later use.
Click the Run Report button. When the export is complete, a message will appear, informing you how many records were exported and giving you the option to create Contacts and/or Affiliations for the exported Grantees and/or Payees.
If you want to create Contacts / Affiliations, enter the desired information, and click OK. If you do not want to create any Contacts / Affiliations, click Skip. Refer to Creating Contacts from Reports and/or Exports in the Introduction, and Adding Affiliation Codes from Reports in the Profile Management module for more information.
Was this article helpful?
