- Print
- DarkLight
- PDF
Link Parent and Individual Folders for Profile and Fund
Link Parent and Individual Folders for Profile and Fund
Profile and Fund folders allow you to store and organize documents in a central location and allow you to easily access them from a record in FIMS. You should only need to do these steps once and is only necessary for Gift Acknowledgement Letters, Grant Letters and Fund Statements.
Profile and Fund Folder buttons located on the Profile and Fund toolbars give you easy access to documents and files stored in their associated Windows folders for Profiles or Funds. These folders are typically used for copies of gift, grant letters or fund statements.
Macros that are run in Microsoft Word templates save individual documents to these profile and fund folders.
You can save, move, or copy documents and other files into the folders through normal methods as you would for any Windows folder. Once there, you'll be able to access them easily from FIMS by clicking on the Profile or Fund folder button for a particular Profile or Fund.
I. Create Parent Profile and Fund Folders
a. Go to the C drive of your computer or on a shared network drive that is mapped to your computer.
- Since all users will be using these folders, it is best to create these on a file server network drive that all computers have access to, rather than a local user's computer. Depending on how your shared network folder is setup, you may have to create local Fund and Profile folders so that macros will work when you run those in Microsoft Word. In that case, you can copy the contents of the local Profile and Fund folders back to a network location as needed.
b. Create two folders in the location that you have chosen; one called Profiles and another folder called Funds.
Here is an example of locally created fund and profile folders. Your folders may be named differently. You can see here that there is a Funds folder and a Profiles folder on the local C drive:
.png)
II. Set FIMS System Options to Link Parent and Individual Profile and Fund Folders
a. In FIMS, select Tools > System Utilities > System Options.
b. Set up Explore_Dir or Explore_Dir_Alt
What is the difference between the Explore_Dir directory and the Explore_Dir_Alt one?
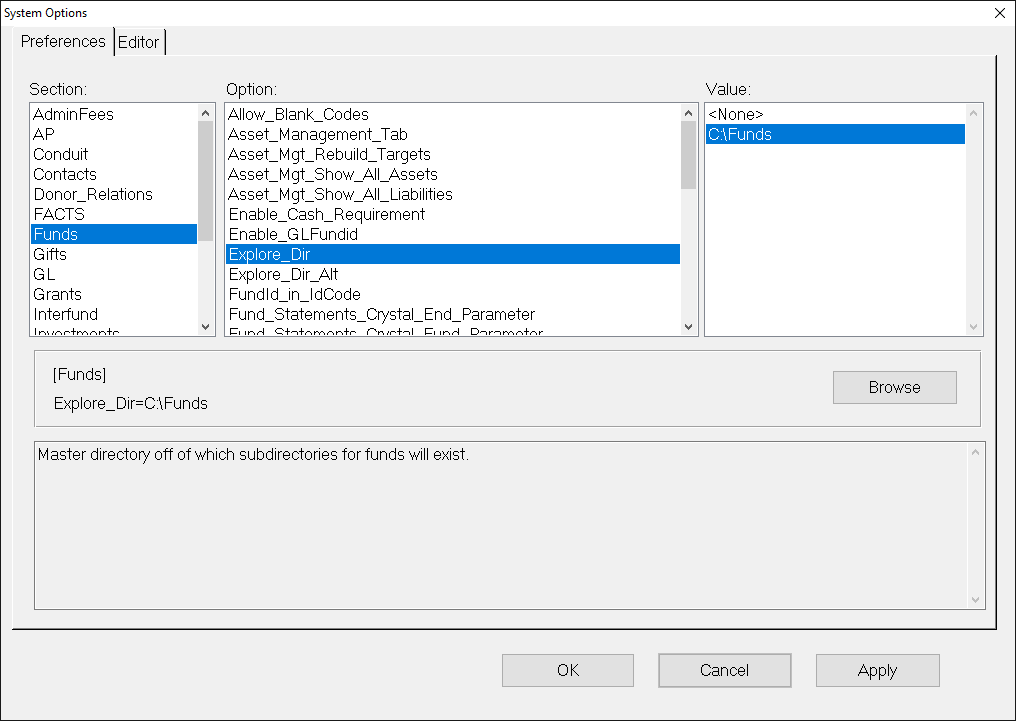
- Funds Folder: In the Section column choose Funds; in the Option column choose "Explore_Dir" or "Explore_Dir_Alt"; then click Browse and navigate to the Fund directory you set up. Select the folder name in the Value pane, and then click OK.

FIMS on Azure: If you click the browse button and choose the local Fund folder, it will not display as C:\Funds, it will show as \\tsclient\C\Funds. To correct that, go to the Editor tab to the funds section and type in C:\Funds and then click Apply and OK. Once you do that, it will show as C:\Funds on the main system options menu in the Funds section.

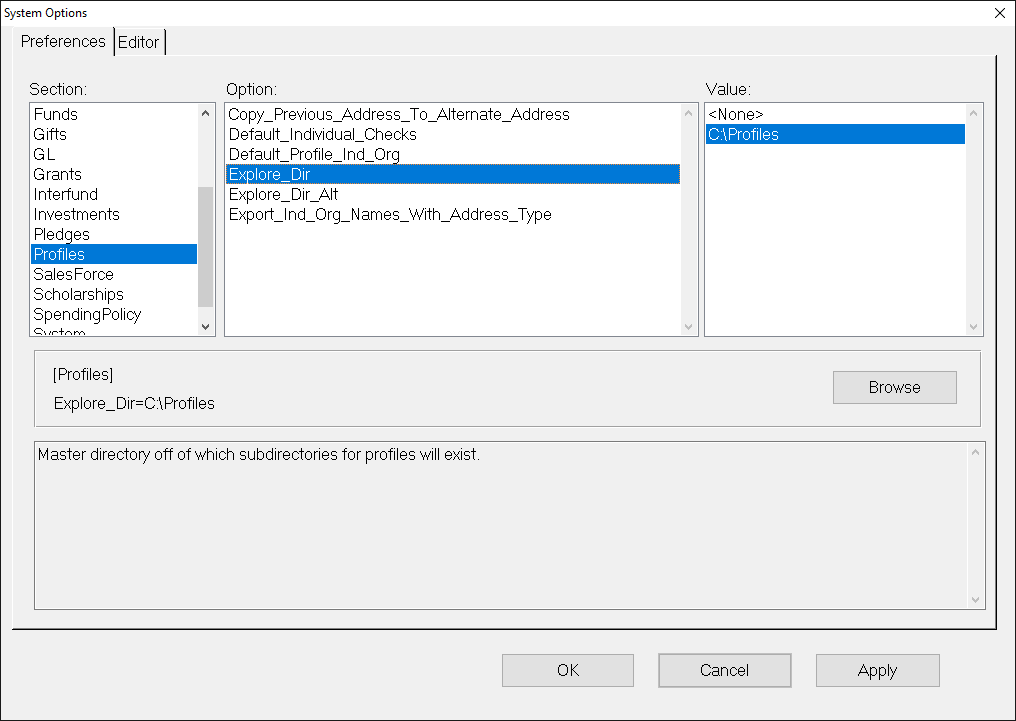
- Profile Folder: In the Section column choose Profiles; in the Option column choose "Explore_Dir" or "Explore_Dir_Alt"; then click Browse and navigate to the Profile directory you set up. Select the folder name in the Value pane, and then click OK.

FIMS on Azure: If you click the browse button and choose the local Profile folder, it will not display as C:\Profiles, it will show as \\tsclient\C\Profiles. To correct that, go to the Editor tab to the Profiles section and type in C:\Profiles and then click Apply and OK. Once you do that, it will show as C:\Profiles on the main system options menu in the Profiles section:

III. Create Individual Profile Folders
In the Profile module, select the Profile record for which you need to have a folder, then click the Profile Folder button on the toolbar:
- The first time you click the Profile Folder button, a folder will be created as a sub-folder underneath the main Profile folder. Each individual Profile Folder is automatically created as a subfolder of the parent folder the first time you click the Profile Folder button on the Profile Management toolbar. The folder name is a combination of the Alpha Sort Name and the Profile’s ID code (for example, Jenkins_Kathy_A_551). Each subsequent time the button is clicked, an explorer window displays the folder contents.
- Each time you click on the button, it will open an Explorer window showing you the contents of the folder.
- Note: Do not create individual Profile folders on your own through Windows. Let FIMS create and name them for you. Then, if the Alpha Sort field is changed, the system automatically changes the name of the Profile folder for that Profile record.
- Note: It is not necessary to create each individual Profile folder prior to running the macro for saving gift acknowledgement or grant letters. If a Profile folder does not exist, the macro will create it.
- The Grants and Scholarships Modules have an additional sub-folder system under the Profile Folder system specifically for Grant and Scholarship Applications. If you are in Applications, Application History, or Conditions, and you click on the Profile Folder button, a sub-folder will be created for that particular Application. Store any documents or files submitted for that particular Application in this folder.
Grant Module:
Scholarship Module:
IV. Create Individual Fund Folders
In the Funds module, select a Fund record for which you would like to have an individual folder, then click the Fund Folder button on the toolbar.
- The first time you click the Fund Folder button, a folder will be created as a sub-folder underneath the main Fund folder. Each individual Fund Folder is automatically created as a subfolder of the parent folder the first time you click the Fund Folder button on the Fund Management toolbar. The name of the folder is based on the Fund ID code (for example, adam for the Adams Fund). Each subsequent time you click the button, an explorer window will open, showing you the contents of the folder.
- Note: Do not create individual Fund folders on your own through Windows. Let FIMS create and name them for you.
- Note: It is not necessary to create each individual Fund folder prior to running the macro for saving letters or statements. If a Fund folder does not exist, the macro will create it.


.PNG)
.PNG)

