- Print
- DarkLight
- PDF
What is a Check Run?
The Check Run batch process is used to group grant requests together as a unit for financial processing. Check Runs can be created independently or created from an approval docket (e.g. Proposal Batch, Scholarship Batch, Grant Batch), see Approval Docket Processing for that process. The check run can be created at any time ahead of grouping the grants and it is expected that standard Check Runs are established at the start of the grant request process. Multiple check runs can be open at any point in time, potentially for the different types of grant requests.
To Create a Check Run:
- Click Batch > Check Runs > +New Check Run.
- Name the Check Run with a descriptive name or use the default: Check Run X/XX/20XX. An explanatory phrase will help the user understand what type of grants should be allocated to this check run.
- Save.
- Grant payments that are available to this check run are listed in the bottom tile. The user can filter the available grants by using the Filter icon on the Available Grant Payments tile.
- By default this grid is filtered by Status and Pay Date. Status is filtered for the "Request" status and Pay Date is filtered for dates less than or equal to the Check Run creation date. The Filter by Default Bank button will add a filter for payments that are linked to the Check Run bank All grants start out with a status of REQUEST.
- Select the payments that will be part of this check run by clicking on the box in the far left column.
- Click +Add Selected to move the indicated grant payments to the top tile for processing in this Check Run.
- The Check Run is ready to process after all desired grants are listed in the top tile.

To Process a Check Run:
- Open the Check Run.
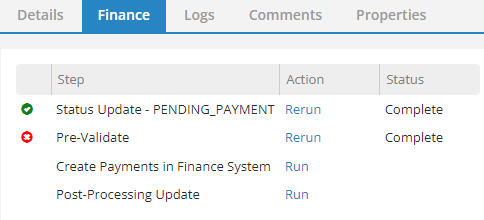
- Open the Finance tab.
- Click Run to run each step listed starting with the first one. The Pre-Validate step checks that all major fields required for financial processing are available on each grant request. A message in the bottom right corner of the screen with show the success for failure of the step.

- The Logs tab show each log generate after a step is ran to:
- display any problems with the grant payments and
- show which grant payments will have invoices created and which will have journal entries created.
- Review the log for errors and adjust the grants, if necessary, here are some common errors. After a step is fully successful a green checkmark will appear next to the step, if unsuccessful a red X will be pictured. See the log to determine which grant is not processing correctly.

- The Create Payments in Finance System step will send the grants to be paid in Financial Edge (FE). Invoices are created and the grant status is changed to Invoicing. At this stage, no changes can be made to the grant request record.
- Most standard grant requests will result in invoice creation, interfund transfers will have journal entries created.
- Wire transfer and non-cash grant payments will not be processed in FE – they are just used to record the transaction, mark the payment as Paid and update the Grant Status.
- The last step, Post-Processing Update, will run automatically during the nightly sync once the grants have been paid in FE. This step brings the check number and paid date from FE into the grants in GE, see Marking Checks as Printed for more information.
Batch Correspondence
This feature allows the user to create correspondence using information related to the check run, such as transmittal letters, acknowledgment letters, etc.
Creating correspondence in a check run will generate either a document for printing or an email. Correspondence templates designed to be used with Grants will populate as an option to send in this batch.
- Select +New Batch Correspondence
- Use the processing popup screen to select “Document” or “Email” and use the drop-down list to select a correspondence template.
- For emails, use the dropdown menu to select the "To" email addresses, either Recipients or Fund Advisors.
- Add optional CC's and customize the email subject line if desired.
- If generating Letters, now is the only time to edit these letters and see all of them at the same time.
Correspondence records will be linked to their parent record. Edits made during the preview are not saved to the parent record. For more information, please see Correspondence Templates.


