Processing a Web Application to a Proposal and Grant
- 03 Jan 2023
- Contributors


- Print
- DarkLight
- PDF
Processing a Web Application to a Proposal and Grant
- Updated on 03 Jan 2023
- Contributors
- Print
- DarkLight
- PDF
Article Summary
Share feedback
Thanks for sharing your feedback!
Through Spectrum Web Portal (SWP), constituents fill out an online application that will get turned into a proposal in Grant Edge Classic (GE Classic). For more information about online applications, see Creating Applications. Before processing web applications, an application workflow needs to be established.
Proposal Web Application:
- Click Web Apps > Manage Online Proposal Applications.
- On the Proposal Applications grid the user can rearrange columns by dragging and dropping the heading of each column.
- To process a web application, it must have the status of Submitted. Here is a list of possible statuses for a web application:
- NEW – An applicant is starting to fill out an application, but hasn't saved it.
- CREATED – An applicant has started to fill out the application, but is not done and will have to go back and finish it. It is in their saved applications.
- SUBMITTED – An organization/business has filled out an application and it is ready to be processed. The application is no longer editable by the applicant.
- COMMITTED – If it is a cyclical application, the application is "done" but the applicant can still return and modify their application anytime before the deadline.
- PROCESSED – A foundation staff member has reviewed the application and declined it or processed it into a proposal.
- EXPIRED – Due date for the application has passed and the application has expired.
- Double-click to open the proposal.
- Tabs:
- Proposal tab – The first page has information about the applicant. If the applicant field is orange, and the Applicant Not Yet Validated check box is checked, it means that the applicant is most likely new and not in Raiser's Edge (RE). The applicant, if approved, will need to be put into RE with the necessary constituent codes such as Grant Payee and/or Grant Recipient.
- Profile tab – Each page from the online application is available for viewing here. Use the drop-down list next to Available Profiles to pick an application page to view the fields from each page.
- Attachments tab – Any attachments that were uploaded with the application will appear here. The user can open these attachments for review. The user can also attach documents here if perhaps the applicant emailed a document after submission of the application.
- Comments tab – A place to put optional comments about the application.
- Correspondence tab – Allows the user to create correspondence to send to the applicant. We mostly see letters of declination at this stage, when an applicant does not meet criteria or didn’t fill out the application correctly. For more information, please see Creating Correspondence Templates.
- Process Info tab – Additional information about the application, including a time stamp of when it was created, submitted and reviewed. After it has been processed into an application a hyperlink to the proposal number will be attached.
- Score tab – As the application is reviewed the scores will appear in the Score Tab with the Reviewers name that reviewed the application.
- More Info tab – On the More Info tab the user can add alerts and see associated records such as constituent records and fund records.

To Process A Web Application:
- Click Web Apps > Manage Online Proposal Applications.
- Open the application.
- Click the drop-down menu next to the Execute button (!).
- Click Create/Update Proposal (or select another action).
- Set To Reviewed – This holds the application until someone can review it before processing it.
- Reopen - The user can reopen the applicant for the applicant to add or change something on the application.
- Create/Update proposal – This processes the application into a proposal for further review and eventual funding or declination.
- Decline – The user can decline the application at this point if the applicant doesn’t meet criteria and there is no need for further consideration from reviewers.
- Edit Application – This allows the user to edit a web application internally, including adding attachments.
- In the new window, select the Proposal Type - this attaches the workflow and default grant type to the proposal in order to make a grant. See separate instructions for creating templates for proposals. If a default Fund wasn't selected when the application was created, you have the ability to choose a fund.
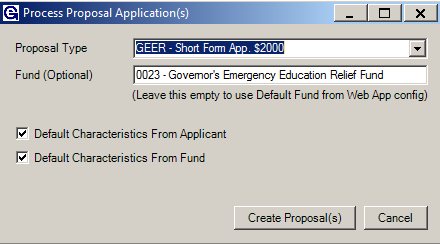
- Check or clear the checkboxes related to characteristics found on the applicant or fund record.
- Click Create Proposal(s).
- In a new window, a confirmation message will appear with the generated proposal ID number. Make note of this number for the next step.

The Proposal Screen:
- Click Proposals > Show All Proposals.
- Filter by ID using the ID from the last step.
- Open the proposal, notice the blue hyperlink that connects the proposal to the web application.
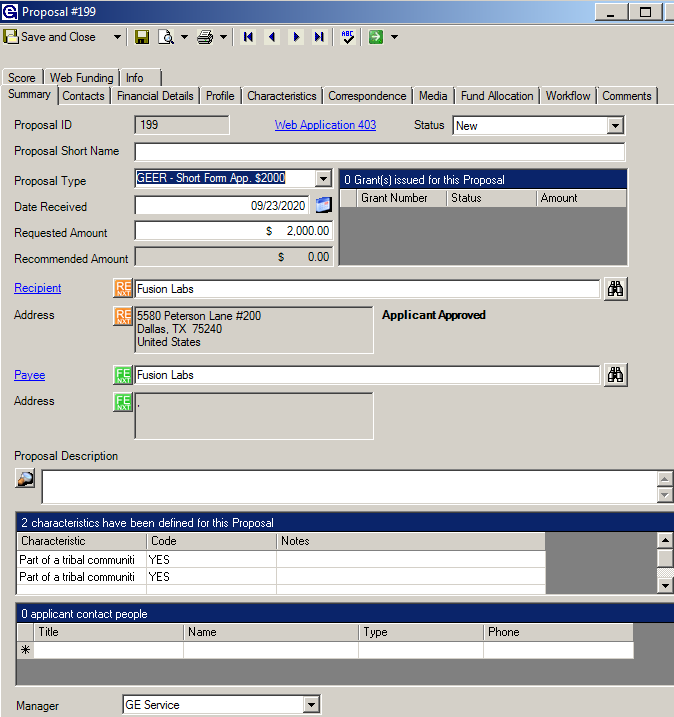
- Summary Tab:
- Proposal Short Name - This field can be mapped from the application and is the project title. This will display in the portal for the applicant to distinguish this proposal from others they have submitted.
- Requested Amount - What the applicant is requesting for their program/project, or for grants that are for a set amount.
- Recommended Amount - The amount which the foundation has approved and set during the first workflow step. See below in Workflow tab for more information. *The recommended amount must be filled in for the proposal/grant to present on the My Awards page of Spectrum NXT.
- Recipient – Mapped from proposal application, if this field is orange, the recipient needs to be linked to their record in RE.
- Payee – Mapped from proposal application, ensure that they are linked to their FE record.
- Characteristics - If one or both of the checkboxes from step 6 in the above process were checked, the default characteristics will default here.
- Contact Tab – Defaults to contacts that are in RE for the organization, if any. The CC hyperlink is typically the person who filled out the application.
- Financial Details – Most of these fields can be mapped from the application to include things like Operating Budget or Other Operating Expenses. The user can type directly into these fields to add financial details about the project and/or organization. To configure additional options use the Tables menu on the Config screen.
- Profile – Use the drop-down to see any specials fields or the pages of the web application and any supplemental pages that were submitted, such as Mid Year Reports.
- Characteristics – These can be mapped from the application or be manually added using the drop-down list.
- Correspondence – Generate a letter or email by choosing a predefined template from the drop-down menu. All correspondence will be recorded here with a time stamp. Most correspondence at this stage are letters of declination or general terms and conditions.
- Media - Attachments from the application will populate here, the user can also add more files if necessary.
- Fund Allocation - If the fund was set in the application then the fund name will default automatically with the Budgeted amount (requested amount). If the fund wasn't set in application, use the fund list from the bottom pane to add the correct fund to the top pane. The Budgeted amount must be entered in order to create a grant later. Type the budgeted amount for each fund directly into the Budgeted column. If using multiple funds, the budgeted amount on each line is what will be taken from each fund, so the total grant amount is a sum of the budgeted amounts of each fund listed.


Workflow and Creating the Grant
The Workflow tab is where this proposal is turned into a grant. The workflow must have at least one review task before a grant can be created. To establish a workflow template see the Workflow Manual.

To Complete a Workflow task:
- Open the task.
- Select the date completed, the user who completed it, and a Step Amount. This is the amount that will be granted, and it must match the budgeted amount on the Fund Allocation tab. If the user enters an amount different than the amount requested, the Recommended Amount on the Summary tab will reflect this new amount.
- Use the drop-down to select from a list of Outcomes.
- Click Save and Close.

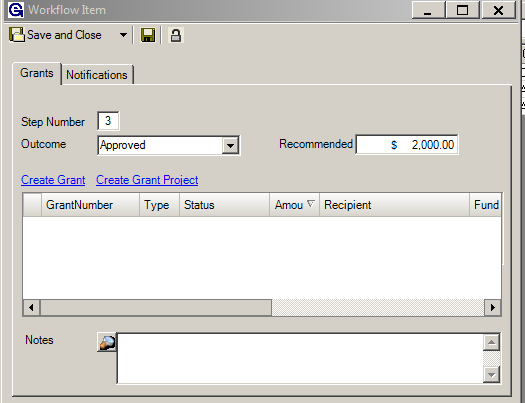
Creating the Grant:
- Open the Create a Grant task on the workflow.
- Enter the outcome, either Declined or Approved.
- The recommended amount should be the amount the user entered in a previous task (review).
- Click Create Grant.
- In the new window, choose what characteristics are to default into the grant by checking or clearing the checkboxes.
- Click Generate.
- The Grant is created and the user can generate correspondence, add a check designation and eventually add payment(s) to a Check Run to be paid.
- Fund Information Tab- Select or if populated the Grants Expense and Grants Payable Account numbers.
- Payment Tab - The user can change the Pay Date manually or use the Schedule Wizard to schedule multiple payments.
- Characteristics Tab - Add all necessary characteristics to the grant.
- Save and Close.

Setting up a Supplemental Page:
- Open the proposal in the Workflow tab.
- Open the Supplemental Step assigned to Web Applicant.
- Check and/or change the due date and fill in the step amount.
- Save and Close.
The Supplemental Page is now available in the portal and can be completed by an Applicant.

Was this article helpful?
