- Print
- Dark
- PDF
Run the Payment Selection Report
The Payment Selection report allows you to review Grant and administrative payables before printing your checks.
Once Vouchers are posted to become Open Items, you can run this report to determine which Grant (or less often, Administrative) items should be paid.
Some organizations post a year’s worth of repetitive Administrative Vouchers (for example, rent payments) and use this report to see what is coming due. Most organizations use the report for Grant payables. The selection fields for the report are very similar to those for the Print Checks utility.
1. In the Accounts Payable module, click the Open Items supertab, and then click the Processes tab.
2. Select Payment Selection Report from the Open Item Processes list and then click the Run Process button. The Payment Selection Report Criteria window opens.
Note: You can also run this report by selecting Reports > Payment Selection Report.
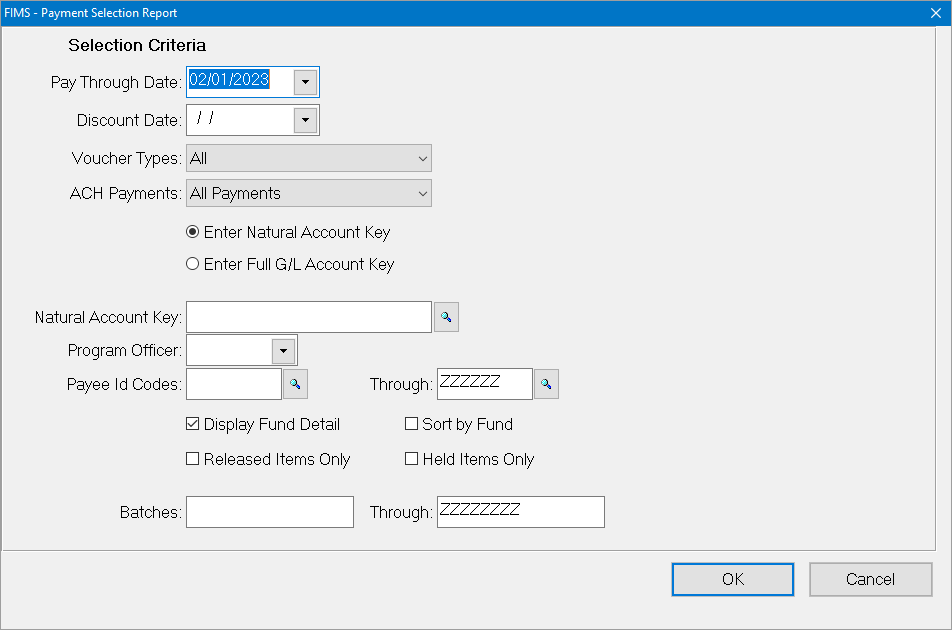
Payment Selection Report Criteria Window

3. Select the Pay Through date that you want to use for the report. Only Open Items with due dates on or before this date will be included on the report. The default value is the current date.
4. (Optional) Enter the Discount Date you want to use for the report. This date selects Open Items that should be paid based on the Discount Date on the Voucher. This field is blank by default.
5. Click the arrow in the Voucher Types drop-down box and select the type(s) of Open Items that you want to include on the report: All, Admin, All Grants, Scholarship Grants, or Non-Scholarship Grants.
6. Click the arrow in the ACH Payments drop-down box and select the type of payments you want to include: All Payments, ACH Payments, or Non-ACH Payments.
7. (Optional) Enter either the Natural Account Key or the Full G/L Account Key for the account you will use to print checks for the selected Open Items. This is useful if, for example, you have multiple checking accounts.
8. (Optional) If you are running the report for Grant Vouchers, and you want to limit your report results by Program Officer, enter the desired Program Officer. Only Grant Vouchers for the selected officer will be included on the report
9. (Optional) If you want to limit your report results to specific payees, enter the desired Payee ID Codes.
10. (Optional) If you want to see the amount due from each Fund, along with the total for the Voucher, select the Display Fund Detail checkbox. This checkbox is selected by default.
11. (Optional) If you only want to see what will be paid when you print checks, select the Released Items Only checkbox. If you clear this checkbox, the report will display all Vouchers that are due to be paid by the selected Pay Through Date (even if they are on hold).
Note: You can only select this checkbox if you clear the Held Items Only checkbox
12. (Optional) If you only want to see the held items, select the Held Items Only checkbox. If you clear this checkbox, the report will display all Vouchers that are due to be paid by the selected Pay Through Date.
Note: You can only select this checkbox if you clear the Released Items Only checkbox.
13. (Optional) If you want to run the report for a specific batch of items, enter the desired range of batch numbers in the Batches From/Through fields.
14. Click OK.
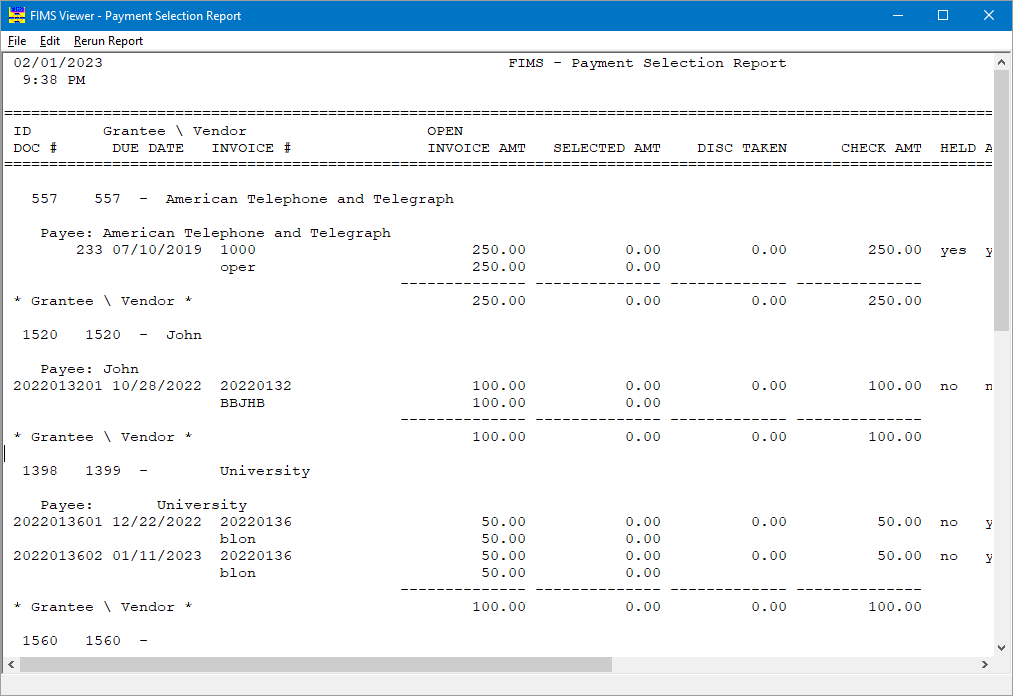
15. Verify the Send To destination, and then click the Run Report button. The Payment Selection report opens in the FIMS Viewer.
Payment Selection Report


