Adding Fields to the Table
- 22 Mar 2024
- Contributors

- Print
- Dark
- PDF
Adding Fields to the Table
- Updated on 22 Mar 2024
- Contributors
- Print
- Dark
- PDF
Article summary
Did you find this summary helpful?
Thank you for your feedback!
Adding Fields to the Table
Once you create a FieldMaker file, you can start adding fields to the table. Refer to Creating a New FieldMaker File for more information.
NOTE: The new FieldMaker table includes one field by default — the Index field that relates the table to the parent FIMS table. In this example, the default field is called idcode.
1. In FieldMaker, click the Field tab, and then click the New button on the toolbar. The Add Field window opens.
Add Field Window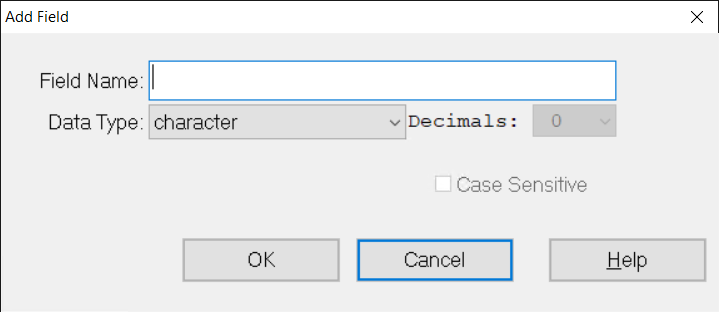
2. Enter the Field Name that you want to use to identify the field in the database (for example, interest_area_1 to identify the first donor interest area field).
IMPORTANT: Do not use spaces in the file name. Please note as well that delimiters and special characters like commas and hyphens should not be used in field names.
3. Click the arrow in the Data Type field and select the data type you want to assign to the field (for example, use the Character type for the interest_area_1 field):
- Character: Alphanumeric text field.
- CLOB: Character Large Object field. Used for long essays, etc. Please refer to the Character Large Object section for more details.
- Date: Calendar date field.
- Decimal: Decimal number field.
- Integer: Natural number field (no decimal places). This type of field can include negative and positive integers, along with zero.
- Logical: Yes / No switch field (for example, a radio button or checkbox).
4. If you selected the Decimal data type, enter the number of decimal places you want to include in the field. The default value is 2.
5. If you selected the Character data type and want the field to be case-sensitive, select the Case Sensitive checkbox. This checkbox is cleared by default.
6. Click OK to add the new field to the list on the Field tab.
7. Enter the Label that you want to use to identify the field on the screen (for example, Interest Area 1 to identify the interest_area_1 field). The label name needs to be unique and different from other FieldMaker fields.
NOTE: You can use spaces in the screen label since it used for the screen interface rather than the connection to the database.
8. Click the arrow in the View As drop-down box and select the option you want to use to present the field on the screen (for example, select Combo Box for interest_area_1):
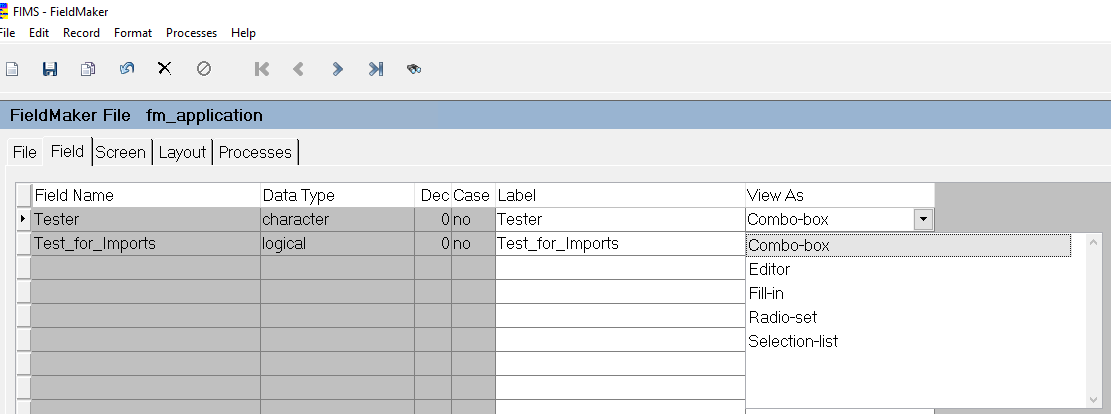
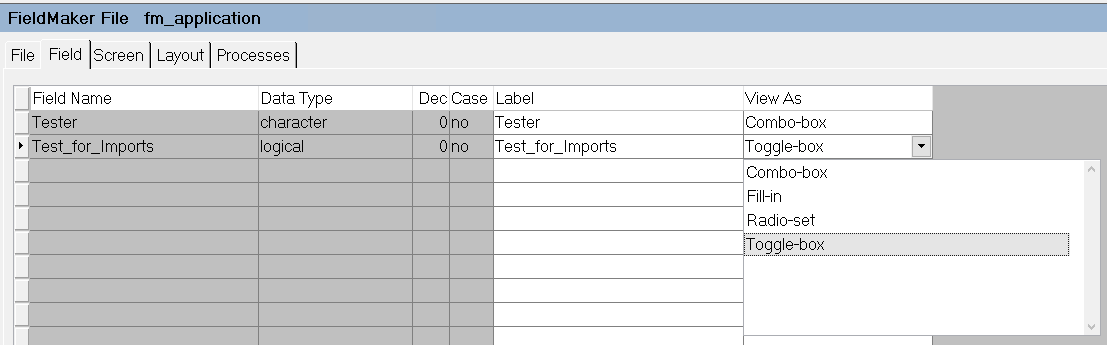
- Combo Box: Data field that you can use to select items from a drop-down list (or type in an entry from the list).
- Editor: Text field that is designed for longer text items (such as comments). Editor fields can have optional scrollbars for long entries.
- Fill-in: Short data entry field. This option can be used by all data types and is the only available option for integer, decimal, and date types.
- Radio-set: Displays mutually exclusive radio buttons that the user can select. This option is often used as an alternative to the combo box when there are three or four choices with no null option.
- Selection-list: A scrolling list that you can use to select one or more values by clicking on the desired value. The data is stored in the field as a comma-delimited list.
- Toggle-box: Displays a checkbox that you can use for logical (yes / no) fields.
9. Click the Properties tab to set the field properties. Refer to Setting FieldMaker Field Properties for more information.
10. Repeat this process for any additional fields you want to create.
- TIP: The easiest way to add a new field that is similar to another field you have created is to copy the existing field (select the field and click the Copy button on the toolbar) and change the name and label. For example, if you wanted to create a field based on interest_area_1, you could copy interest_area_1 and change the name to interest_area_2.
Was this article helpful?

