Maintain Affiliation Codes
- 24 Jun 2024
- Contributors

- Print
- Dark
- PDF
Maintain Affiliation Codes
- Updated on 24 Jun 2024
- Contributors
- Print
- Dark
- PDF
Article summary
Did you find this summary helpful?
Thank you for your feedback!
Affiliation Codes indicate how a Profile record is affiliated with the organization and identify Profiles as part of a group for reporting or mailing. Refer to Adding Affiliation Codes to a Profile for more information about these codes.
Note: When you maintain Affiliation codes, there is an additional option to indicate whether the code is temporary. Temporary Affiliation codes can be globally deleted via the Delete Temporary Affiliation Codes utility or deleted from a Profile.
1. In Profiles, select File Maintenance > Profile Code Maintenance > Affiliation. The Affiliation Code Maintenance Data Grid opens.
Affiliation Code Maintenance Data Grid.png)
2. Do one of the following:
- If you want to create a new Affiliation code, click the New button on the toolbar.
- If you want to view and/or edit an existing Affiliation code, select the desired code from the data grid and either click the View Affiliation button or double-click the desired code.
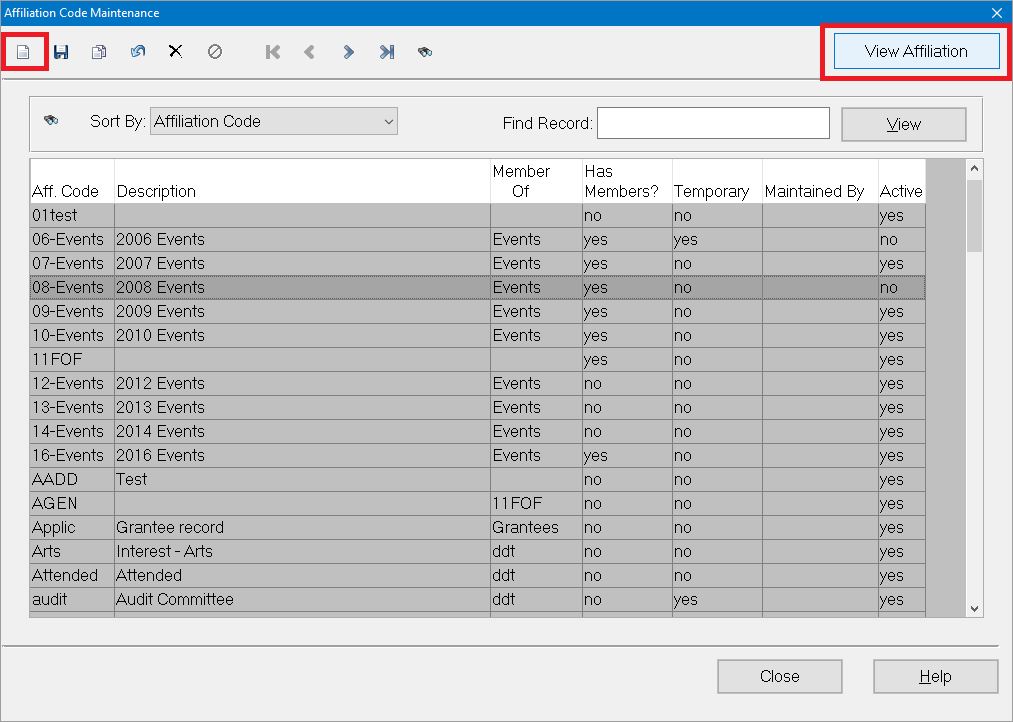
The Affiliation Code Maintenance window opens.
Affiliation Code Maintenance Window
.png)
3. In the Affiliation Code field, enter the code (up to 10 characters).
Note: If you are editing an existing code, this field will be grayed out and cannot be changed.
4. In the Description field, enter a short text description of the code (up to 50 characters).
Note: IMPORTANT: Certain special characters in Affiliation Code and Description can cause problems when exported from FIMS or to other software such as Word or Excel. The errors are not always obvious, so please take care not to use any of the following characters here: Apostrophes (') (both "single quotes" on the quotation key and the tilde key), the tilde itself (~), quotation marks ("), commas (,), and hyphens (-) with a space before or after. (Hyphens flush with the characters before and after (a-b) work correctly.
5. In the Maintained By field, enter your FIMS username.
6. (Optional) If the code will only be used temporarily (e.g., if you want to use it to mark Profiles for a specific purpose, and then remove the code from those Profiles), select the Temporary checkbox.
7. (Optional) If you want to add the code you are editing to an Affiliation Group, enter the desired Group Name in the Affiliation Group field.
Note: If you add the code to a group, it will not appear alone on the Affiliations tab in Profile Management – it will only appear in association with its group. For example, if you add the Cent1 code to the Devcom group, you have to open the Devcom group on the Affiliations tab in order to see Cent1.
8. (Optional) If you want to make the code you are editing into a group code, select the desired code(s) from the Available Codes field and click the Add button to add them to the Member Codes pane.
Note: If you add any codes here, the code you are editing automatically becomes a group code, and the Member Codes will not appear alone on the Affiliations tab in Profile Management – they will only appear in association with the group. For example, if you add the Sem and TopDon codes to the Cent1 group, you have to open the Cent1 group on the Affiliations tab in order to see Sem and TopDon.
9. Click the Save button on the toolbar.
10. Repeat this process to create or edit more Affiliation codes (or groups).
11. When you are completely finished, click the Close button.
Example: Create a Group of Seminar Attendee Codes
There is an existing Affiliation code called Seminar Attendance. You want to turn this code into a group code that contains codes for the spring and fall conferences.
1. Edit the Seminar Attendance code (SEM).
2. Add SEMSpring (Spring Conference) and SEMFall (Fall Seminar) codes as members of the SEM code (by moving them from Available Codes to Member Codes).
Example: SEM Code Maintenance with SEMFall and SEMSpring as Members
3. Save the code.png)
4. On the Affiliations tab in Profiles, SEM will appear as a folder in the tree view, and SEMSpring and SEMFall will be pages in that folder.
Example: Seminar Group on the Affiliations Tab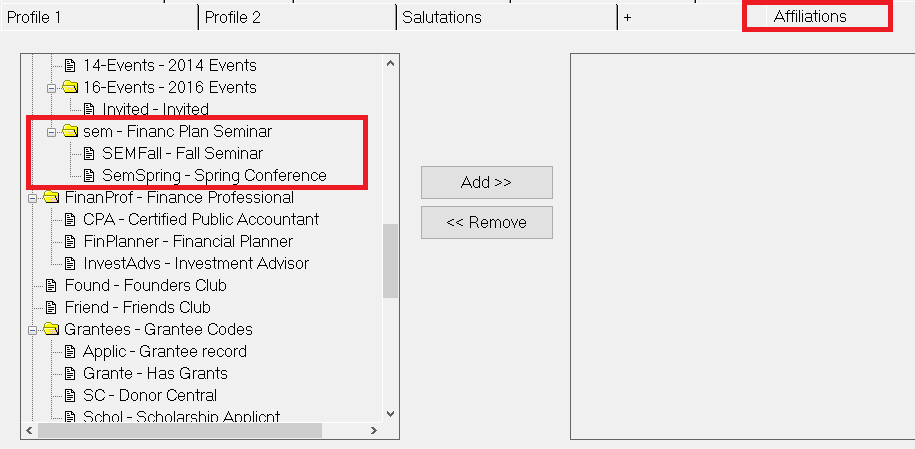
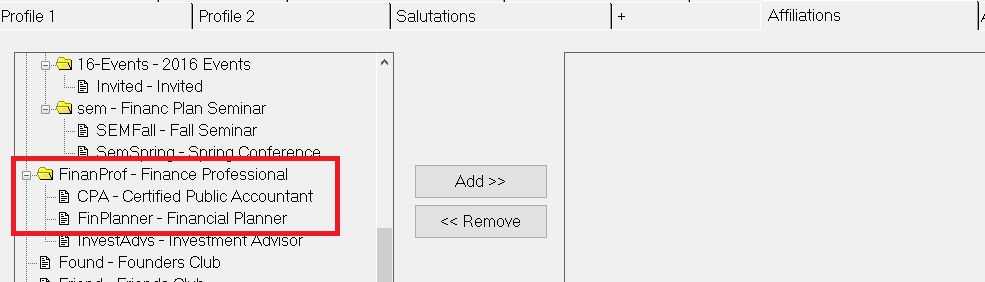
Example: Add the Financial Planner Code to the Professional Group
There is a group code called Finance Professional (FinanProf) that contains codes related to various professions. You want to add the Financial Planner (FinPlanner) code to this group.
1. Edit the Financial Planner code (FinPlanner).
2. In the Affiliation Group field, select FinanProf.
3. Save the code
.png)
4. On the Affiliations tab in Profile Management, FinanProf will appear as a folder in the tree view, and FinPlanner will be a page in that folder.
Note: The system will automatically add the Prof group code to any Profiles that already have the FinPlanner code assigned to them.
Delete Temporary Affiliation Codes
Running the Delete Temporary Affiliation Codes utility globally removes the selected temporary Affiliation code from all Profile records that contain it.
Note: You can only use this utility to delete codes that are marked as temporary in Affiliation Code Maintenance. Keep in mind that after you remove the code from the Profile records, it still exists as a valid code that you can add to other Profile records. If you want to remove the code from FIMS, you can do so via Affiliation Code Maintenance.
Note: You cannot undo this process.
1. In the Profile Management module, select File Maintenance > Delete Temp Affiliation Codes. The Delete Temporary Affiliation Codes window opens.
Delete Temporary Affiliation Codes Window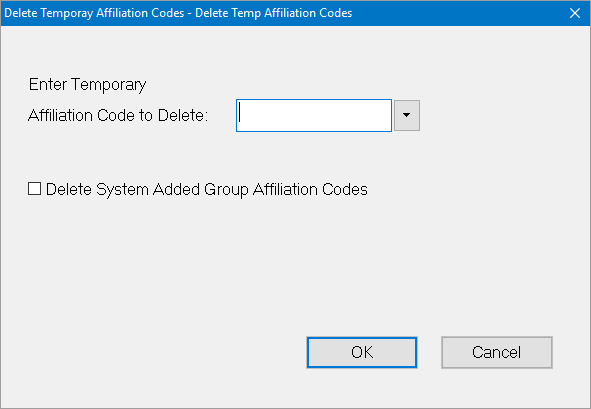
2. Click the arrow in the Enter Temporary Affiliation Code to Delete drop-down box and select the code that you want to delete.
Note: The drop-down allows you to expand and collapse Affiliation Group folders, so you can select codes within a group.
3. (Optional) If you want to remove any Affiliation codes that were added by the system (for example, by Adding Affiliation Codes from Reports), select the Delete Related System Added Group Affiliation Codes checkbox.
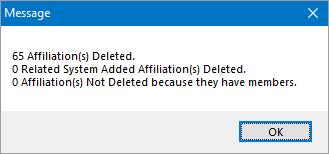
4. Click OK. A confirmation message appears to ask if you are sure you want to delete the selected code. Click Yes. A message appears to tell you how many Affiliations were deleted.
Example: Deleted Affiliations Message
The Affiliation Code Mass Add utility allows you to perform two functions:
- Add an Affiliation code to all Profiles that currently contain another selected Affiliation code. For example, you could run the utility three times to tag the Profiles of your board, development, and investment committees for an invitation to an upcoming retreat.
- Add an Affiliation code to all Profiles that currently contain both of two other Affiliation codes (logical and). For example, you could add an Affiliation code called gave to all retreat invitees who also have Donor history.
Note: The logical or can be achieved at export run-time using Build Mailing Groups (for example, if you need to mail to all retreat invitees who do not have a Donor record).
Note: The Affiliation code must be defined before you can add it to any Profile records.
1. In the Profile Management module, select File Maintenance > Affiliation Code Mass Add. The Affiliation Code Mass Add window opens.
Affiliation Code Mass Add Window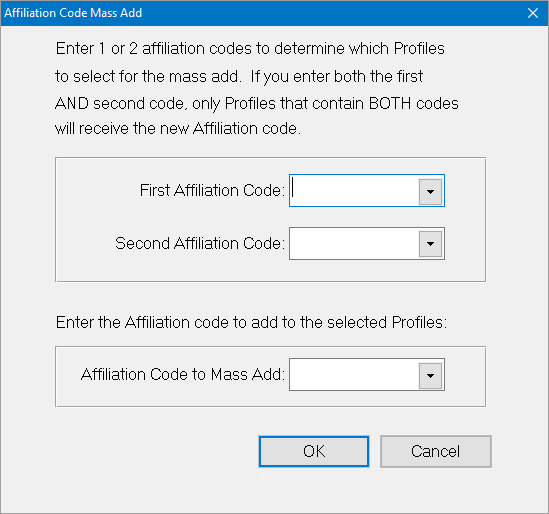
2. Do one of the following:
- If you want to add the new Affiliation code to Profiles that have one other Affiliation code, enter the existing code in the First Affiliation Code field and leave the Second Affiliation Code field blank.
- If you want to add the new Affiliation code to Profiles that have both of two other Affiliation codes (logical and), enter the existing codes in the First Affiliation Code and Second Affiliation Code fields.
3. Enter the Affiliation Code to Mass Add.
Note: If you are not sure of the exact code, you can click the arrow in any of the code-related drop-down boxes to select the desired code from a list. The code selection dropdowns allow you to expand and collapse Affiliation Group folders, so you can select codes within a group.
4. Click OK. A confirmation message appears to make sure you want to add the selected Affiliation code. Click Yes to add the Affiliation code to the selected Grantee records, or No to return to the Affiliation Code Mass Add window and make any changes. Once you click Yes, a message appears to tell you how many Affiliation codes were added.
Build Affiliations by Zip Code
The Build Affiliation by Zip Code utility allows you to add an Affiliation code to all Profiles that contain a specific zip code (or range of zip codes). You can run this utility multiple times to create a regional Affiliation group that includes more than one zip code.
Note: The Affiliation code must be defined before you can add it to any Profile records.
1. In the Profile Management module, select File Maintenance > Build Affiliation by Zip Code. The Build Affiliation by Zip Code window opens.
Build Affiliation by Zip Code Window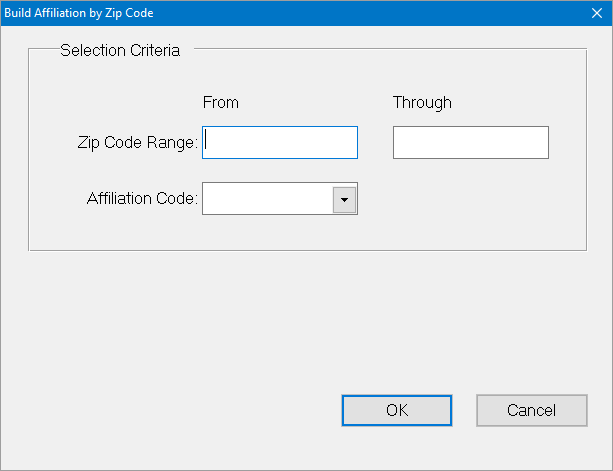
2. In the Zip Code Range fields, enter the range of zip codes that you want to use to add the Affiliation code to Profile records.
Note: If you want to add the code to Profile records with one specific zip code, enter the same code in both the From and Through fields.
3. Enter the Affiliation Code that you want to add to the selected records.
Note: If you are not sure of the exact code, you can click the arrow in the Affiliation Code drop-down box to select the desired code. The code selection drop-down allows you to expand and collapse Affiliation Group folders, so you can select codes within a group, if necessary.
4. Click OK. A confirmation message appears to make sure you want to add the selected code. Click Yes to add the Affiliation code to the selected Grantee records, or No to return to the Build Affiliation by Zip Code window and make any changes. Once you click Yes, a message appears to tell you how many Affiliation codes were added.
The Add Affiliations for Donors utility allows you to add an Affiliation code to identify Donors based on giving history criteria (for example, Gift Date, Fund ID, Division, Class, Type, Sub-Type, and Amount).
You can further limit the records that receive the Affiliation code by entering a donation amount range and Fund selection information (Fund ID, Division, Class, Type, and Subtype).
Note: The Affiliation code must be defined before you can add it to any Profile records.
1. In the Profile Management module, select File Maintenance > Add Affiliations for Donors. The Add Affiliations for Donors window opens.
Add Affiliations for Donors Window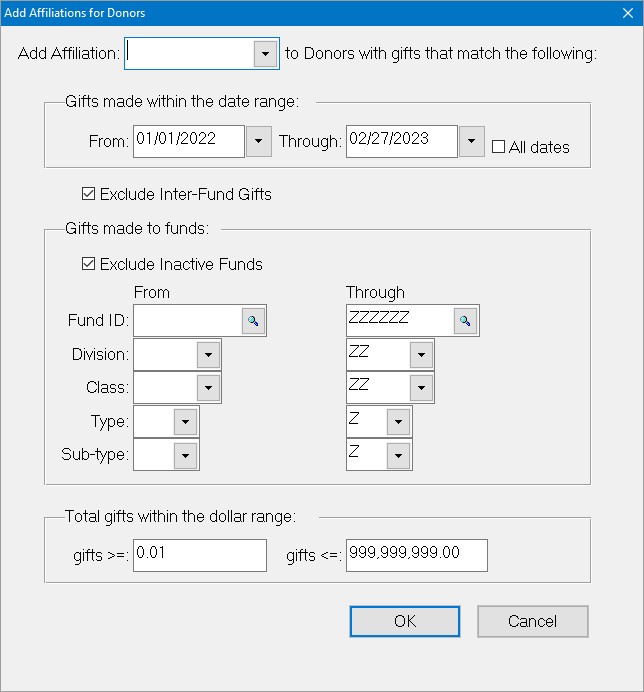
2. In the Add Affiliation field, enter the Affiliation code that you want to apply to Donors that meet your selection criteria.
Note: If you are not sure of the exact code, you can click the arrow in the Add Affiliation drop-down box to select the desired code. The code selection drop-down allows you to expand and collapse Affiliation Group folders, so you can select codes within a group.
3. In the Gifts Made Within the Date Range section, do one of the following. The selected Affiliation code will only be added to Donors who made Gifts during the selected date range:
- If you want to add the code to Donors that made Gifts during a range of dates, enter the dates in the From and Through fields.
- If you want to add to the code to Donors that made Gifts on one specific date, enter the same date in both the From and Through fields.
- If you want to add the code to Donors that made Gifts at any time, select the All Dates checkbox.
4. (Optional) In the Gifts Made to Funds section, do any or all of the following. The selected Affiliation code will only be added to Donors whose Gifts were made to the selected Fund(s):
- If you only want to include Gifts to active Funds, select the Exclude Inactive Funds checkbox.
- Enter the Fund ID range that the Donors made Gifts to. If you only want to add the code to Donors who donated to one Fund, enter the same ID code in both the From and Through fields.
- Enter a range of Division codes, Class codes, Type codes, or Sub Type codes that you want to use to limit the Donors who receive the Affiliation code.
5. (Optional) In the Total Gifts Within the Dollar Range section, enter the dollar range (for total Gifts from the Donor) that you want to use to limit the Donors who receive the Affiliation code. For example, if you only want to add the code to Donors who have given more than $10,000 in total Gifts, enter 10,000.00 in the Gifts >= field and leave the default value (99,999,999.00) in the Gifts <= field.
Note: This amount only considers actual, net Gift Amounts. It does not include Non-Gift Amounts.
6. Click OK. A confirmation window opens where you can verify your selection criteria before adding the Affiliation codes.
Example: Confirmation Window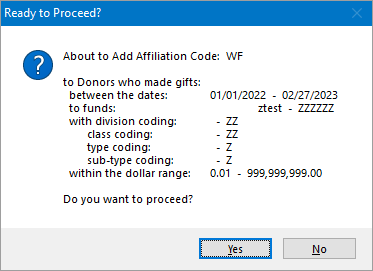
7. Click Yes to add the Affiliation code to the selected Donor records, or No to return to the Add Affiliations for Donors window and make any changes. Once you click Yes, a message appears to tell you how many Affiliations were added.
The Add Affiliations for Grantees utility allows you to use an Affiliation code to identify Grantees based on selected Grant History criteria (for example, Grant Date, Fund ID, Division, Class, Type, Sub-Type, and Amount).
Note: The Affiliation code must be defined before you can add it to any Profile records.
1. In the Profile Management module, select File Maintenance > Add Affiliations for Grantees. The Add Affiliations for Grantees window opens.
Add Affiliations for Grantees Window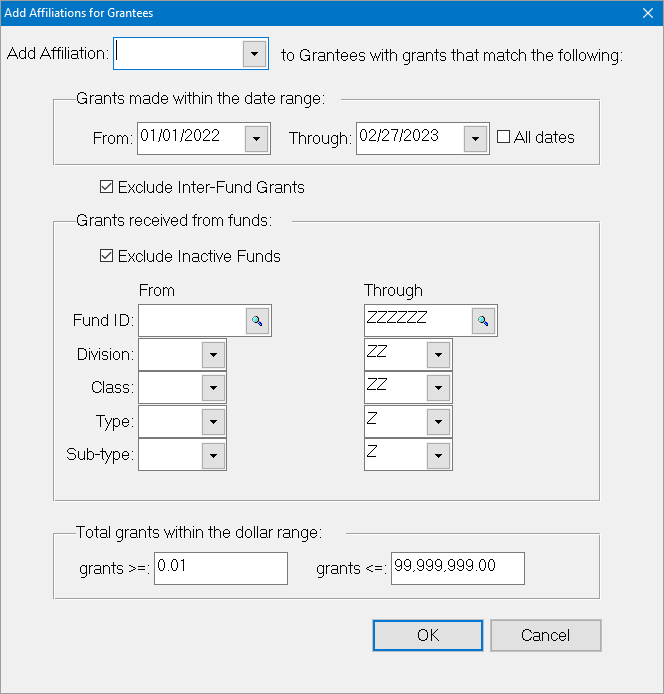
2. In the Add Affiliation field, enter the Affiliation code that you want to apply to Grantees that meet your selection criteria.
Note: If you are not sure of the exact code, you can click the arrow in the Add Affiliation drop-down box to select the desired code. The code selection drop-down allows you to expand and collapse Affiliation Group folders, so you can select codes within a group.
3. In the Grants Made Within the Date Range section, do one of the following. The selected Affiliation code will only be added to Grantees who received Grants during the selected date range:
- If you want to add the code to Grantees that received Grants during a range of dates, enter the dates in the From and Through fields.
- If you want to add to the code to Grantees that received Grants on one specific date, enter the same date in both the From and Through fields.
- If you want to add the code to Grantees that received Grants at any time, select the All Dates checkbox.
4. (Optional) If you want to exclude any Interfund Grants from being included in this process, select the Exclude Interfund Grants checkbox. This checkbox is selected by default.
5. (Optional) In the Grants Received from Funds section, do any or all of the following. The selected Affiliation code will only be added to Grantees who received Grants from the selected Fund(s):
- If you only want to include Grants from active Funds, select the Exclude Inactive Funds checkbox. This checkbox is selected by default.
- Enter the Fund ID range that the Grantees received Grants from. If you only want to add the code to Grantees that received Grants from one Fund, enter the same ID code in both the From and Through fields.
- Enter a range of Division codes, Class codes, Type codes, or Sub Type codes that you want to use to limit the Grantees who receive the Affiliation code.
6. (Optional) In the Total Grants Within the Dollar Range section, enter the dollar range (for total Grants to the Grantee) that you want to use to limit the Grantees who receive the Affiliation code. For example, if you only want to add the code to Grantees who have received more than $10,000 in total Grants, enter 10,000.00 in the Grants >= field and leave the default value (99,999,999.00) in the Grants <= field.
7. Click OK. A confirmation window opens where you can verify your selection criteria before adding the Affiliation codes.
Example: Confirmation Window
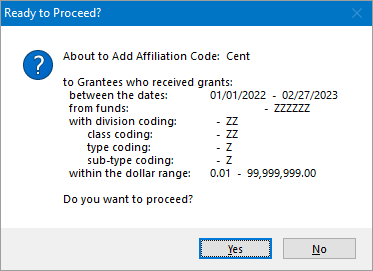
8. Click Yes to add the Affiliation code to the selected Grantee records, or No to return to the Add Affiliations for Grantees window and make any changes. Once you click Yes, a message appears to tell you how many Affiliation codes were added.
Add Affiliations for Fund Reps
The Add Affiliation for Fund Reps utility allows you to add an Affiliation code to all Profile records that contain a specified Fund Rep code (or range of Fund Rep codes). It also allows you to remove Affiliation codes from Profile records that do not contain the specified Fund Rep code(s).
This is an easy way to synchronize the Affiliation codes that are often used for selection in many reports and exports with Fund Representatives.
Note: The Affiliation code must be defined before you can add it to any Profile records.
1. In the Profile Management module, select File Maintenance > Add Affiliations for Fund Reps. The Add Affiliations for Fund Representatives window opens.
Add Affiliations for Fund Representatives Window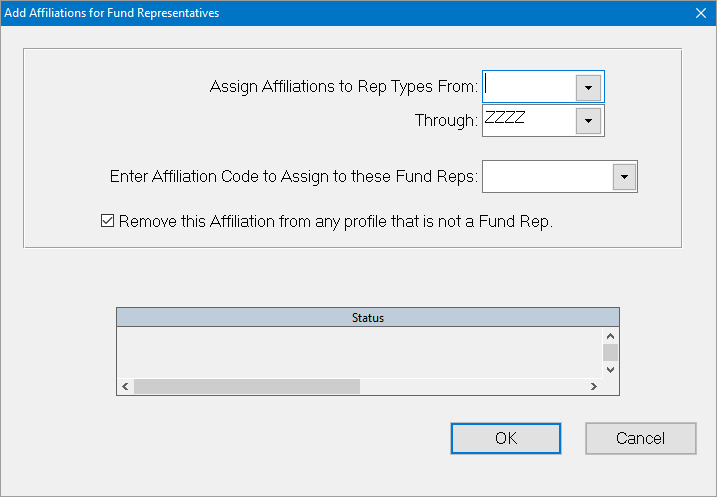
2. In the Assign Affiliations to Rep Types fields, enter the range of Fund representatives that you want to add the Affiliation code to. If you only want to add the code to a single Fund Rep Type, enter the same code in both the From and Through fields.
3. Enter the Affiliation Code to Assign to these Fund Reps.
Note: If you are not sure of the exact code, you can click the arrow in the Enter Affiliation Code to Assign drop-down box to select the desired code. The code selection drop-down allows you to expand and collapse Affiliation Group folders, so you can select codes within a group.
4. If you want to remove the Affiliation code from any Profile records that do not contain the specified Fund Rep Type code, select the Remove this Affiliation from any Profile that is not a Fund Rep checkbox.
5. Click OK. A confirmation window opens where you can verify your selection criteria before adding the Affiliation codes.
Example: Confirmation Window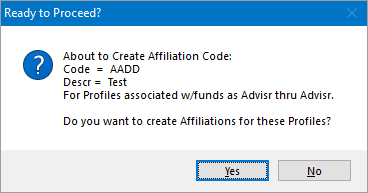
6. Click Yes to add the Affiliation code to the selected Profile records, or No to return to the Build Affiliations for Fund Reps window and make any changes. Once you click Yes, a message appears to tell you how many Affiliations were added.
Note: While the utility is running, the Status section of the Build Affiliations for Fund Representatives window displays a running list of Profiles that are receiving the Affiliation code (and their ID codes). This is useful if you are adding codes to a large number of Profiles (which can take several minutes), because you can see where the utility is in the process.
Add Affiliations from Exported Files
The Add Affiliations from Exported File utility allows you to add an Affiliation code to Profile records, based on the Profile ID codes contained in an export (ASCII/delimited text) file.
Note: The utility will add the Affiliation to each relevant Profile reflected in the export once – regardless of how many times the Profile appears in the export file.
This utility can be used for standard FIMS exports or exports created from Results or Crystal Reports.
Note: CAUTION: The utility depends on the presence of the column label IDCode being in the first record of the export file. Some exports (for example, the Grant History Export), use a different label. For these exports, open the exported data file in Word, change the column label, and save the file (as a text file, not as a Word document or spreadsheet) before running the utility.
Note: IMPORTANT: Carriage returns or tabs within comment (editor) fields can cause the utility to fail. Use the Excel export format (Send To tab when you run the export) to avoid this problem. Refer to the FIMS Reports section for more information about running exports.
Note: NOTE: The Affiliation code must be defined before you can add it to any Profile records.
1. In the Profile Management module, select File Maintenance > Add Affiliations from Exported File. The Add Affiliations from Exported File window opens.
Add Affiliations from Exported File Window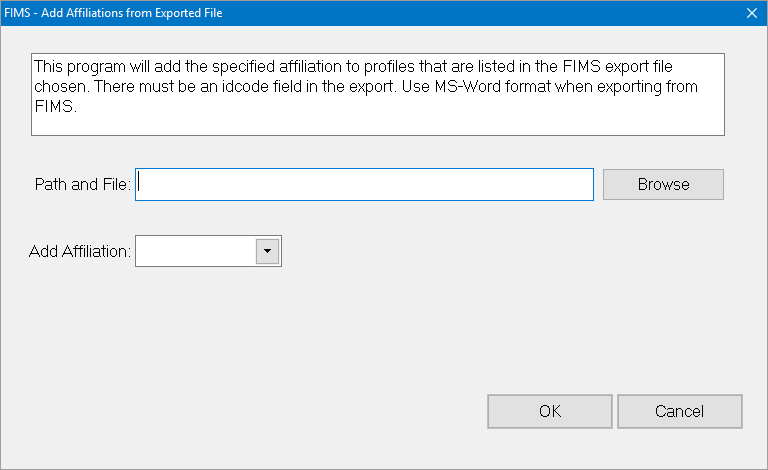
2. Enter the Path and File name where the desired export file is located. If you are not sure of the exact location, click the Browse button to search for the desired file.
3. In the Add Affiliations field, enter the Affiliation code that you want to add to the Profile records listed in the export file.
4. Click OK. A message window opens to tell you how many Affiliation codes were added. It also tells you how many Profiles already had the Affiliation code and how many of the Profiles in the file were unique.
Add Affiliations by Relationships
The Add Affiliations by Relationships utility allows you to add an Affiliation code to Profile records that are related to a selected Profile record or connected (either as a relatee or a realtor) to a selected Relationship code.
Note: The Affiliation code must be defined before you can add it to any Profile records.
Note: This section contains a general procedure for adding affiliations, along with three specific examples to help you understand different ways you can use this utility.
1. In the Profile Management module, select File Maintenance > Add Affiliations by Relationships. The Add Affiliations by Relationship window opens.
Add Affiliations by Relationship Window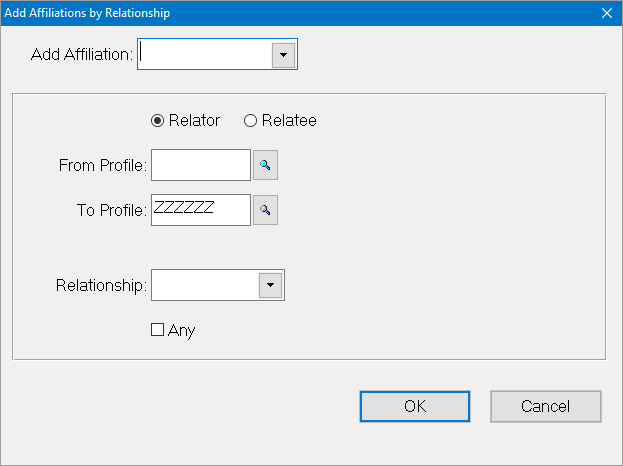
2. In the Add Affiliation field, enter the Affiliation code that you want to apply to the Profile records that meet your selection criteria.
Note: If you are not sure of the exact code, you can click the arrow in the Add Affiliation drop-down box to select the desired code. The code selection drop-down allows you to expand and collapse Affiliation Group folders, so you can select codes within a group.
3. Do one of the following:
- If you want to add the Affiliation code to the relatees of a given Profile (or range of Profiles), select the Relator code. This indicates that the Profiles in the From Profile and To Profile fields are the relator Profiles.
- If you want to add the Affiliation code to the relators of a given Profile (or range of Profiles), select the Relatee code. This indicates that the Profiles in the From Profile and To Profile fields are the relatee Profiles.
4. Enter the range of Profile ID codes that you want to check for the selected Relationship code. If you want to check a single Profile record, enter the same ID code in both of these fields.
5. Enter the Relationship code that you want to use as the basis for adding the Affiliation code. Only Profiles that have this type of relationship will receive the selected Affiliation code.
Note: If you want to add the Affiliation code to any Profile that is related to the selected Profile(s), regardless of the type of relationship, select the Any checkbox.
6. Click OK. A confirmation window opens where you can verify your selection criteria before adding the Affiliation codes.
7. Click Yes to add the Affiliation code to the selected Profile records, or No to return to the Add Affiliations for Profiles with Relationship window and make any changes. Once you click Yes, a message appears to tell you how many Affiliations were added.
Example 1
Your organization wants to send a mailing all Profiles related to the United Way, no matter what the nature of the relationship (all Profiles that are relatees of the United Way – regardless of the Relationship code).
1. Create an Affiliation code to add to the selected Profile records (for example, UWay – United Way mailing).
Tip: Refer to Adding Affiliation Codes to a Profile for more information.
2. Run the Add Affiliations by Relationships utility using the following information:
- In the Add Affiliation field, enter the Affiliation code you want to add (Uway).
- Select the Relator radio button.
- Enter the Profile ID code for the United Way in both the From Profile and To Profile fields.
- Select the Any checkbox. Any Profile that is a relatee of the United Way will receive the UWay Affiliation code.
3. Click OK and then click Yes in the confirmation window that opens.
Example 2
Your organization wants to mail to all board members at the United Way (all Profiles that are relatees of the United Way with a Relationship code of BOD - Board of Directors).
1. Create an Affiliation code to add to the selected Profile records (for example, MPP -- The Millennium Philanthropy Project).
Tip: Refer to Adding Affiliation Codes to a Profile for more information.
2. Run the Add Affiliations by Relationships utility using the following information:
- In the Add Affiliation field, enter the Affiliation code you want to add (MPP).
- Select the Relator radio button.
- Enter the Profile ID code for the United Way in both the From Profile and To Profile fields.
- In the Relationship field, select BOD. Any Profile that is related to the United Way by this code will receive the MPP Affiliation code.
3. Click OK and then click Yes in the confirmation window that opens.
Example 3
Your organization wants to hold a planned giving seminar for all financial advisors to Donors. These Profiles are not identified with Affiliation codes, but in every case financial planners are relatees of Donors, with a Relationship code of P1 (Financial Planner).
1. Create a temporary Affiliation code to add to the selected Profile records (for example, Sem – Invite to Seminar).
Tip: Refer to Adding Affiliation Codes to a Profile for more information.
2. Run the Add Affiliations by Relationships utility using the following information:
- In the Add Affiliation field, enter the Affiliation code you want to add (Sem).
- Select the Relator radio button to find the Relator Profiles participating in the selected relationship. The Affiliation code will be added to the Relatees (if you select the Relatee button, the code will be added to the Donors instead).
- Leave the default values in the From Profile and To Profile fields (the From Profile field should be blank and the To Profile field should say ZZZZZZ)
- In the Relationship field, select P1. Any Profile that is related to the United Way by this code will receive the Sem Affiliation code.
3. Click OK and then click Yes in the confirmation window that opens.
Move User Codes to Affiliations
The Move User Codes to Affiliations utility allows you to duplicate Profile User-Defined codes (on the Profile 2 tab) as Affiliation codes. If the new Affiliation code does not have a corresponding entry in the Affiliation code table, one will be created.
You can also use this utility to clear the values from any of the Profile user-defined fields.
Tip: Refer to Maintaining Profile User-Defined Codes for more information about these codes.
1. In the Profile Management module, select File Maintenance > Move User Code to Affiliations. The Add Affiliation from User Codes window opens.
Add Affiliation from User Codes Window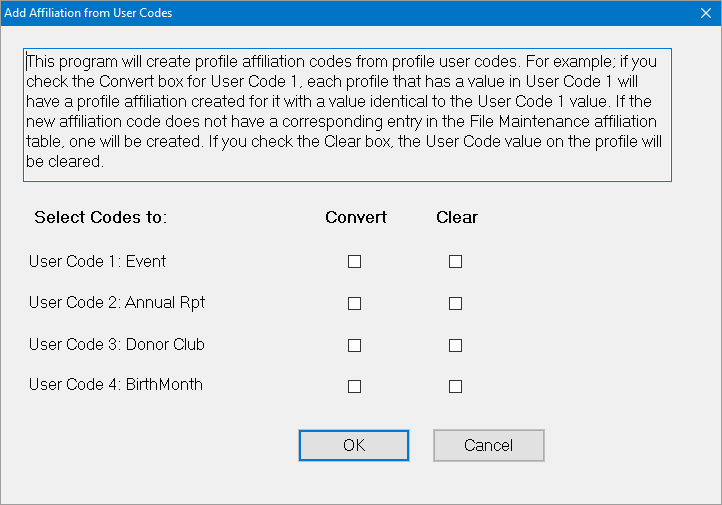
2. Do one of the following:
- If you want to create an Affiliation code based on a Profile User-Defined code, select the Convert checkbox next to the desired User Code.
- If you want to remove the value from the Profile User field, select the Clear checkbox next to the desired User Code.
Tip: Recommendation: Do not convert or clear the User Code 3 or User Code 4 fields if you are using them for text entry instead of code entry.
3. Click OK. A message window opens to tell you how many Affiliations were created.
Create User Codes from Affiliations
The Create User Codes from Affiliations utility allows you to add a Profile User-Defined code to Profile records, based on existing Affiliation codes.
When you run this utility, you will be prompted to enter either one or two Affiliation codes. This allows you to do the following:
- Add a Profile User-Defined code to all Profiles that currently contain a selected Affiliation code.
- Add a Profile User-Defined code to all Profiles that currently contain both of two Affiliation codes (logical and).
Tip: This utility is similar to the Affiliation Code Mass Add utility. Refer to Mass Adding Affiliation Codes for more information.
1. In the Profile Management module, select File Maintenance > Create User Codes from Affiliations. The Create User Codes from Affiliations window opens.
Create User Codes from Affiliations Window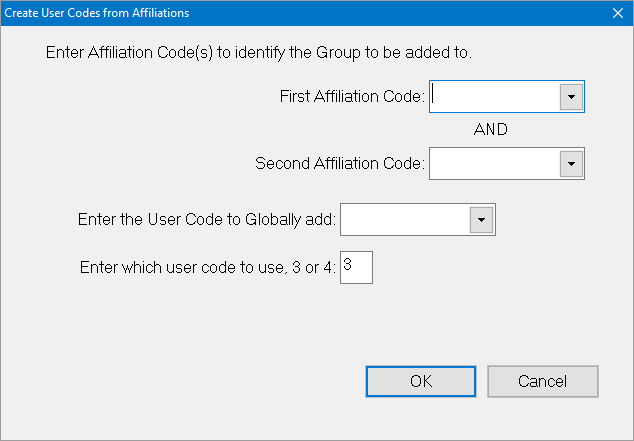
2. Do one of the following:
- If you want to add the Profile User-Defined code to Profiles that have one Affiliation code, enter the desired code in the First Affiliation Code field and leave the Second Affiliation Code field blank.
- If you want to add the Profile User-Defined code to Profiles that have both of two Affiliation codes (logical and), enter the desired codes in the First Affiliation Code and Second Affiliation Code fields
3. In the Enter the User Code to Globally Add field, enter the code that you want to add to the Profile User-Defined code field.
4. In the Enter Which User Code To Use field, enter either 3 or 4. These numbers apply to the third and fourth Profile User-Defined code fields. This indicates where the new code will be added.
Note: If the third or fourth User fields already contain data, this utility will not overwrite the existing data.
Note: If you want to add data to the third User field, and it already contains data, but the fourth User field is empty, the data will automatically be added to the fourth User field. Contact FIMS Support for help in clearing these fields before running this utility.
5. Click OK. Any Profile record that contains the selected Affiliation code(s) will receive the selected Profile User-Defined code in the field you specified. When the process is complete, a message window appears to tell you how many codes were updated.
Add Affiliations from Reports and/or Exports
Several reports and exports in FIMS (for example, Export to Word Processing, Gift History, Gift History Export, and Application History Export) allow you to create Profile Affiliations for each unique Profile ID code included in the report or export.
Create Affiliations from Reports
1. Run the desired report.
2. Click Create Contacts/Affs on the FIMS Viewer menu bar. The Create Contacts/Affiliations window opens.
.PNG)
.png)
3. Select the Create Affiliation Records for checkbox. A drop-down box appears to the right of the checkbox.
4. Click the arrow in the drop-down box and select the Affiliation code you want to add to the Profiles on the report.
Note: You can also enter a new Affiliation code in this field (that does not currently exist in the code table), but you will then have to update the Affiliation code table to reflect the new code.
5. Click OK. A confirmation window opens to ask if you are sure you want to add the selected Affiliation code to all of the Profiles on the report. Click Yes.
Create Affiliations from Exports
1. Run the desired export. Once the export is finished, the Create Contacts/Affiliations window opens automatically.
Note: The window is slightly different from the one that opens when you choose to create Affiliations from reports, because it also acts as a confirmation message to tell you how many records were exported.
2. Follow the steps for Creating Affiliations from Reports (above).
Configuring Automatic Affiliation Codes
FIMS automatically adds some Affiliation codes to a Profile based on any the following:
- Donor Prospects: When a Donor record is added for a Profile, the Donor Prospects Affiliation code specified is applied to that Profile.
- Donors with Gifts: When the first Gift from the Donor is posted, the Donors with Gifts Affiliation code is applied to the Profile and the Donor Prospects code is deleted. This provides an automatic method for tracking prospects and Donors.
- Grant Applicants: When a Grantee record is added for a Profile, the Grant Applicants Affiliation code is applied to that Profile.
- Grantees with Grants: When the first Grant to a Grantee is posted, the Grantees with Grants Affiliation code is applied to the Profile, and the Grant Applicants code is deleted.
Note: For these automatic codes to be accurate, do not manually assign them to Profile records.
You can select the codes that you want to use for each of these events by doing the following:
1. In the Profile Management module, select Tools > System Utilities > System Initial Setup. The System Initial Setup window opens.
2. Click the Mailing Setup tab. The Affiliation code fields are located in the Automatic Affiliations section of the window.
Mailing Setup Tab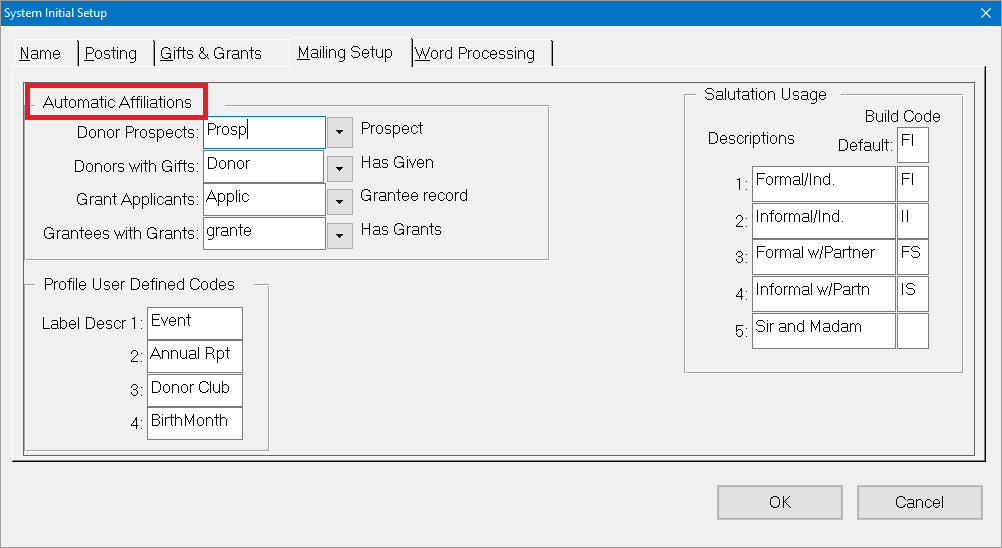
3. Click the arrow in each of the drop-down boxes and select the desired Affiliation code for each event.
4. When you are finished, click OK. The Change Automatic Affiliations window opens.
Change Automatic Affiliations Window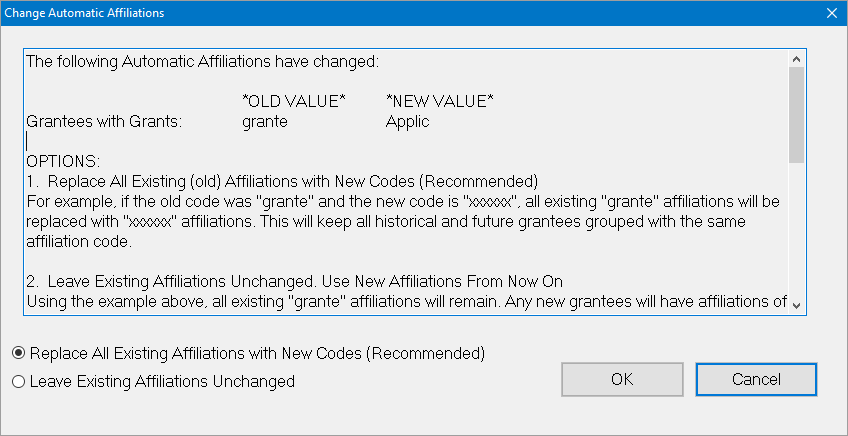
5. Do one of the following:
- (Recommended) Select the Replace All Existing Affiliations with New Codes radio button to go through the entire FIMS database and make the necessary changes to the Affiliation code assignments.
- Select the Leave Existing Affiliations Unchanged radio button to keep the existing code assignments unchanged and only add the new Affiliation code assignments from this point on.
6. Click OK.
FIMS uses several other automatic Affiliation codes:
- When a Vendor record is created for a Profile, the Vendor Affiliation code is applied to the Profile.
- When a Student record is created for a Profile, the School Affiliation code is applied to the Profile.
- If you have the optional Scholarship Management module, when the first Scholarship Application from a Student is saved, an affiliation code is automatically applied to the Profile. You can select the code that you want to use via the New_Application_Affiliation option in Scholarship System Options. Refer to System Options – Scholarships for more information.
Was this article helpful?

