Running Reports and Exports
- 27 Dec 2024
- Contributors

- Print
- Dark
- PDF
Running Reports and Exports
- Updated on 27 Dec 2024
- Contributors
- Print
- Dark
- PDF
Article summary
Did you find this summary helpful?
Thank you for your feedback!
Running Reports and Exports from the Data Grid
FIMS allows you to run ad-hoc reports and exports directly from most FIMS Data Grids. These reports include the information for each column in the current Data Grid. You can choose to include hidden columns in the report as well. You can also choose to either include all of the records in the Data Grid or limit the report to selected and tagged records.
Reports and exports from the Data Grid are different from most standard FIMS reports, in that you do not choose selection and sorting criteria when you run the report. Instead, you must filter your Data Grid to include the records and fields that you want to see before running the report. For example, if you want to run an export that excludes Profiles that have the Allow Mail flag turned off, you must configure your view to exclude those records before running the export. Refer to Configuring View Settings for more information on configuring your views.
1. Open the desired Data Grid.
2. If you want to run a report or export for a specific record or group of records, select and tag the desired record(s).
3. Click the Process Selections button. The Process Selections window opens.
Process Selections Window.png) 4. Select either the Report or Export radio button.
4. Select either the Report or Export radio button.
5. If you want to report or export tagged records (instead of all available records), select the Tagged Items Only checkbox.
6. If you have hidden columns in your Data Grid that you want to display on your report (or include in your export), select the Include Hidden Columns checkbox.
Note: This checkbox is only available when you run reports from Full views. Optimized views do not contain hidden columns.
7. (Optional) If you are running a report from a data grid that includes ID codes and you want to use it to create mailing labels or an email message, select the Labels and Email checkbox. Refer to Creating Labels from the Data Grid below and Sending Email Messages from the Data Grid below for more information.
Note: Selecting this checkbox may cause your report to run more slowly, depending on the number of records you are including. Be sure to leave this checkbox cleared if you do not want to create labels or email.
8. (Optional) If you are running a report and you want to place a visible delimiter between rows of data, click the arrow in the Row Delimiter drop-down box and select the desired delimiter. This is useful if, for example, you have data that takes up more than one row in the report.
9. Click OK. The Send To window opens (similar to standard FIMS reports).
Tip: Send your data grid report to the Graphical Viewer and you will be able to not only print it, but export to Word, Excel, PDF, or other formats as well. The options here are the same as those for standard reports with the graphical viewer options.
10. Choose the location where you want to send the report or export. The default location for reports is Screen for reports, and File for exports.
11. (Optional) If you are running a report, enter a Report Subtitle (for example, the name of the Data Grid that you are reporting from).
12. Click the Run Report button. One of the following occurs:
- If you are running a report, the report opens in the FIMS Viewer.
NOTE: The width of the columns in your report is related to the width of the columns in the data grid. If the text in any of the columns in your report is wrapping and you do not want it to, go back to your data grid view and increase the size of the column in the view.
- If you are running an export, the system creates the appropriate export file and presents a confirmation message to tell you how many records were exported.
Tip: Making Temporary Data Grid Selections for Reports
In addition to presenting a list of available records based on the criteria you define; Data Grids are ad hoc report writers. Most of the views that you configure will be saved for future use, however, there may be times when you only need to make temporary selection on records and fields in a data grid so you can run a quick report.
1. Click the View Settings button, selecting the primary view you want to use.
2. Update the desired fields on the Selection, Sorting, or Affiliation tabs.
3. (Optional) Add or remove the desired fields from the Columns tab.
4. Click Generate View. When you are prompted to save the view, click No. The view will generate with your changes, and you can use it to run a report, without saving the configuration.
Creating Labels from the Data Grid
This process is similar to creating labels from the Address Listing with Labels and Email report.
1. Run a report from the data grid, making sure to select the Labels and Email checkbox in the Process Selections window.
Labels and Email Checkbox.png)
NOTE: This option is only available when you are running reports from data grid views that include Profile ID codes.
2. In the FIMS Viewer, select Labels > Options. The Label Options window opens.
.PNG)
Label Options Window
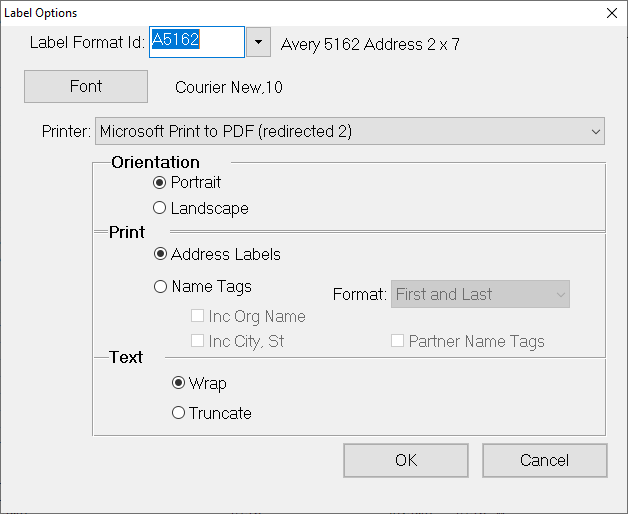 3. Verify the label format and the printer options, and then click OK to return to the FIMS Viewer.
4. Select Labels > Preview to see what the labels will look like when they are printed.
Example: Label Preview 5. Once you verify the page layout, close the preview window.
6. Select Labels > Print to print the labels. 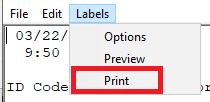 Sending Email Messages from the Data Grid
There are several ways to send email messages from the data grid. Microsoft Outlook must be installed to use this feature.
Note: This option is not available for FIMS on Azure Cloud due to Microsoft Office not being available
- Use Process Selections to run a report that allows you to generate a mass email. This process is similar to sending email messages from the Address Listing with Labels and Email report and is useful if you want to send an email to a large group of Profiles and/or optionally send email to the Profile's spouse.
Note: This option is only available when you are running reports from data grid views that include Profile ID codes.
Note: This option always uses the primary email address for the Profile record – it does not use email addresses from Alternate Address records. If you want to send an email to an alternate email address, tag the desired records in the data grid and then right-click and select Email.
- Tag one or more records in the data grid and then right click and select Email to send an email to the selected Profiles.
Note: This option is only available when the Email Address field is included in the data grid setup (it does not have to be visible).
- Tag one or more records in the data grid and click the Send Email button on the toolbar.
Note: This option is only available when the Email Address field is included in the data grid setup (it does not have to be visible).
Sending Email from a Data Grid Report
1. Run a report from the data grid, making sure to select the Labels and Email checkbox in the Process Selections window.
Labels and Email Checkbox.png) 2. In the FIMS Viewer, select Send Message > Options. The Send Message Options window opens.
2. In the FIMS Viewer, select Send Message > Options. The Send Message Options window opens.
Note: In order to see the Send message option, you must have Mapi enabled:
I'm running a profile report and it's missing the "Send Message" option.
Send Message on Menu
.PNG)
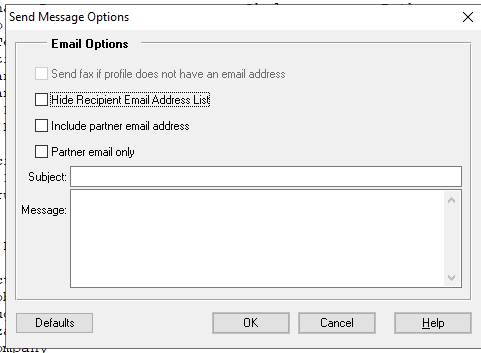
3. Select any of the following options:
- If the Profile does not have an email address and you want to send a fax, select the Send Fax if Profile Does Not Have an Email Address checkbox.
Note: You must have fax software installed to use this option. Please contact FIMS Support for more information.
- If you want to hide the list of recipients when you send the email (blind carbon copy), select the Hide Recipient Email Address List checkbox.
Note: You should select this option if you want to protect the privacy of the email recipients, or if the list of email addresses is very large.
- If you want to send the email to both the Profile and their spouse, select the Include Spouse Email Address checkbox.
- If you only want to send the email to spouses and not to the main Profile, select the Spouse Email Only checkbox.
4. (Optional) In the Subject field, enter the subject line for your message.
5. (Optional) In the Message field, enter the body of your message.
6. (Optional) If this is a message that you send on a regular basis, click the Defaults button and save the message settings for future use.
7. When you are finished, click OK to return to the FIMS viewer.
8. Select Send Message > Via E-Mail. The recipient list, subject line, and message body are automatically added to a new email message in your default email application.
Note: IMPORTANT: If you receive a message requesting access to Outlook, select the Allow Access For checkbox and click Yes. If you do not select this checkbox and click Yes, then you will have to confirm every single email address before the message will be generated. If you click No, the process will close without creating an email message.
Sending Email from Within the Data Grid
Note: This option is not available for FIMS on Azure Cloud due to Microsoft Office not being available
Microsoft Outlook must be installed to use this feature.
Sending email from within the Data Grid is useful when you want to send an email to a single Profile or a small group of Profiles. If you want to send an email to multiple records, you must select all of the desired records – tagging records does not include them in the email, they must be selected (highlighted).
Note: In order to send email from within a Data Grid, the grid must include the Email Address field as a column, and the column cannot be hidden.
1. Configure your data grid to include the Email Address field as a column.
2. Select the desired record(s) in the Data Grid.
- If you want to select multiple, contiguous records, hold down the Shift key on your keyboard and use your mouse to select the first and last record you want to include.
- If you want to select multiple non-contiguous records, hold down the Ctrl key on your keyboard and use your mouse to select all of the desired records.
3. Do one of the following:
- Right-click and select Email.
- Click the Send Email button on the module toolbar (if available). FIMS opens your email program and automatically inserts the email addresses for all of the selected records into the To field.
4. Compose and send your email message as desired.
Was this article helpful?

